Marel Laboratory
This software has been designed to automate data gathering during the certification of MAREL systems. It can also be used to try communication with various devices used in MAREL testing systems.
Protection key
To operate the software, a protection key specially programmed by MAREL is required. The key contains the menu of devices for which the license has been acquired. The software cannot be used for instruments not present on the menu.
Communication serial ports
The MAREL Laboratory program, if used for the acquisition of certification data, requires two communication serial ports. If on the other hand it is used to try communication with devices or to display acquired values,then one port is sufficient.
Using the program
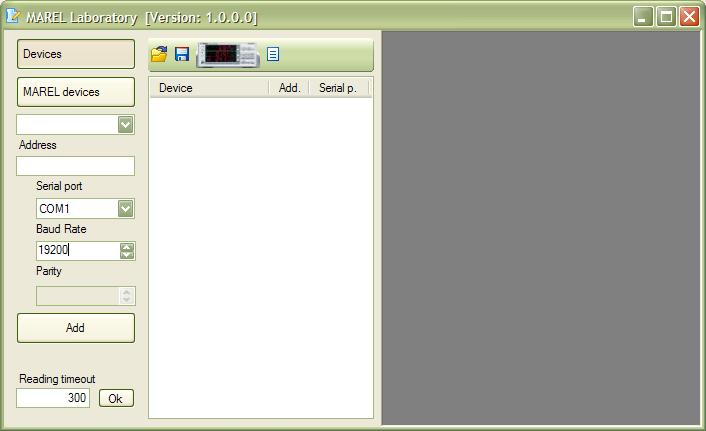
The program start-up appears as in figure:
As you can see, all the available commands and the menu of configured devices are visible in the left-hand panel.
Adding a device
First of all, to test communication with a device or to acquire the values read by the device it is necessary to know the following information:
- address;
- communication speed (baud rate);
- parity bit (not for all).
The procedure to add a device is as follows:
- press the “Devices” or “MAREL devices” key according to the type of device;
- select the name of the device from the drop-down menu immediately below;
- insert the address;
- select the communication serial port on the drop-down menu(*);
- select the baud rate;
- set the parity;
- press the “Add” key.
For the device that has just been inserted a window is created with which it is possible to interact to manually read the values acquired. The procedure can be carried out to add more instruments simultaneously which will then be included in the list with the following information:
- type of device;
- address;
- communication serial port.
Removing a device
To remove a device that has previously been added, there are two ways to proceed:
- click the mouse on the close box of the form of the device itself;
- select the device on the list and use the right-hand key of the mouse to select “Remove” on the menu.
Saving a configuration
The menu of devices added may be saved and thereafter loaded without having to add the devices that make up a system one by one.
To save the configuration:
- insert the name of the configuration and press Save.
Loading a configuration
A configuration that has already been saved, contained in the menu of devices, can be loaded at any moment.
To load a configuration:
- select the name of the configuration and press the Open key.
Modifying a serial port
The communication serial port is saved in the configuration file. To modify it, use the right-hand key of the mouse to select one of the devices present on the list and change the selected port on the “serial port” menu displayed.
The modification will be carried out for all the devices associated with this particular port.
<important note>The menu be empty if the serial ports are not available</note>
Connecting the Yokogawa WT200
This software requires the use of the WT200 as the certified instrument of comparison, so it is necessary to connect it to the system in order to acquire the values simultaneously.
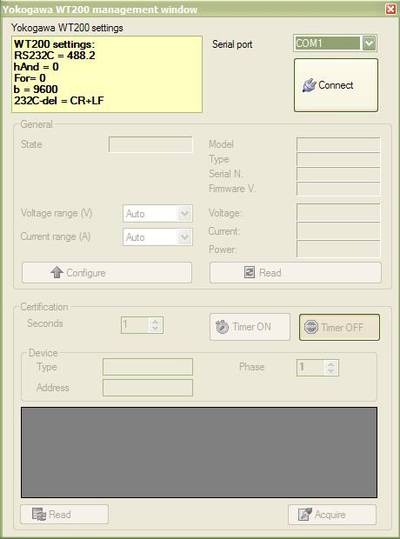
Press the  key to display the following window:
Make sure that the instrument is configured with the parameters as shown upper left, then select the communication serial port to which it is connected and press Connect.
If next to the word State the phrase RX ERROR appears in red, then check the following:
- the instrument is switched on;
- the instrument is correctly connected to the pc's communication serial port;
- the instrument's communication parameters correspond to those shown in the window.
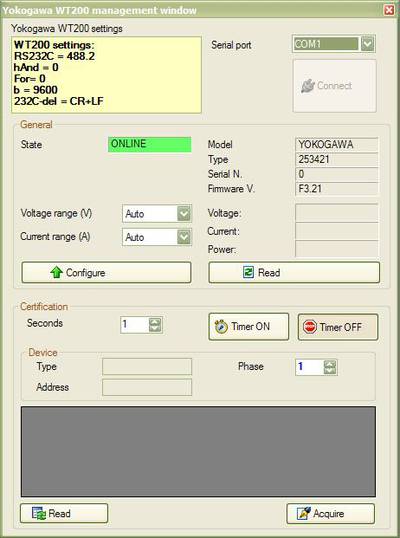
If on the other hand the wT200 is correctly connected, then together with the word ONLINE a series of information read by the device itself will be visible:
Modifying the full scale
From the General panel it is possible to modify the full scale of voltage and current by proceeding as follows:
- select the voltage range in Voltage range (V);
- select the current range in Current range (A);
- press the Configure key.
Reading the instantaneous values
To read the electrical magnitude registered by the instrument,press the Read key located in the General panel.
Certification procedure
To simultaneously read the values registered by the WT200 and by one of the devices present on the list, proceed as follows:
- Selection of device : click the mouse on the list of devices to select which one to read.The type and address of the one selected will be visible in the Device panel.
- Selection of phase : click the mouse on the Phase panel to select the phase to read in the instrument.
- Reading the values : press the Read key to simultaneously read the values of the device and those of the WT200. The values read will be visible in the grid just above. To enable reading at fixed intervals of one or more seconds, press the Timer ON key. To interrupt the reading,press the Timer OFF key at any moment.
- Saving the values : to save the values read, press the Acquire key. The data acquired can be displayed simultaneously in the certification form as described in the following paragraph.
Management of certification data
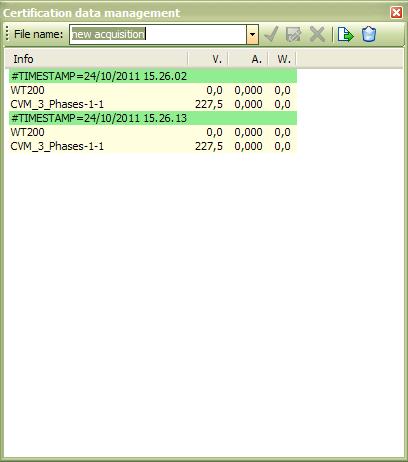
Before the certification phase or thereafter during the procedure itself it is possible to display the values which one by one are saved. To access the window for the management of certification data,press the ![]() key. The program will display the following window:
key. The program will display the following window:
All the values acquired will be saved in text files which can be renamed, eliminated or copied using the functions made available by the program.
Removing values acquired by error
To eliminate one or more values acquired by error, proceed as follows:
- with the right-hand key of the mouse,select the line with the word #timestamp that you intend to eliminate;
- select “Eliminate” on the menu displayed.
<important note>An eliminated acquisition cannot be recovered!</note>
Creating a new file or use an existing file
If you want to save the values acquired in a new file or a file different from the one selected:
- insert the name of the file in the File name box or select it from the drop-down menu;
Renaming the file in use
If you want to rename a file in use:
- insert the new name for the file;
Eliminating the file in use
To eliminate one or more files, proceed as follows:
- select the file to eliminate from the drop-down menu;


