MarelEOLTs
MarelEOLTs is an application for acquiring and processing data sampled from different devices, for reading electrical and physical quantities. One or more test stations can be defined in the software. The software is made up of three programs, one for managing the system configuration Configuration Management, one for managing the archive Archive Management and finally Station Management for carrying out the tests .
Using the program : Configuration Management
Let's start by seeing the operation and use of the Configuration Management program, for configuring the system so that the other programs can communicate correctly with each other. When the program starts without any active configuration, it will be asked you to create an administrator account, without which it will be no possible to configure the system. You can cancel the request by pressing the Cancel button and proceed to the main screen which will be this:
All the features for each tab in the program are described below.
Users
The Users window is used to create, modify and disable users. The screen is as follows:
Below is the function of the toolbar buttons :
First we should log in by pressing the button Login![]() and since it is the first start, and having canceled the initial request to create an account as per the previous instructions, we should now do it via the following screen:
and since it is the first start, and having canceled the initial request to create an account as per the previous instructions, we should now do it via the following screen:
It will be necessary , specify the following data :
- Type : type of account, at first start it will only be possible to use the administrator;
- Code : numeric code to use to log in;
- Name : name of the operator who will use this account or a description of the account type;
- Password : password to log in, it is not mandatory to specify it;
Confirm the creation of the user by clicking on the button OK, or cancel the operation by clicking the button Cancel.
The types of accounts that can be created are in sequence from highest to lowest privileges : Tecnic admin , Administrator, Power user e Operator Below we see the difference in privileges for each type of account:
| Funzioni Tabs | Tecnic admin | Administrator | Power user | Operator | ||||
|---|---|---|---|---|---|---|---|---|
| Edit | View | Edit | View | Edit | View | Edit | View | |
| Users | x | x | x | x | x | x | ||
| Models | x | x | x | x | x | x | ||
| Families | x | x | x | x | x | x | ||
| Images | x | x | x | x | x | x | ||
| Sequences | x | x | x | x | x | x | ||
| Anomaly definition | x | x | x | x | x | x | ||
| Image items | x | x | x | x | x | x | ||
| Languages | x | x | x | x | x | x | x | x |
| Stations | x | x | ||||||
| Channels | x | x | ||||||
| Station channels | x | x | ||||||
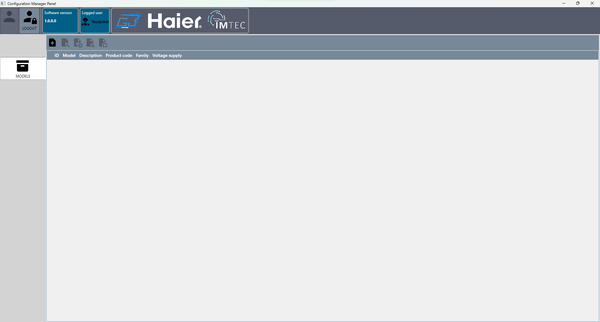
Models
Click on the Models ![]() button to access the following screen :
button to access the following screen :
Below is the function of the toolbar buttons :
New Model
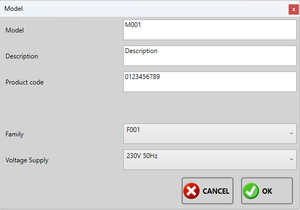
To create a template, click on the ![]() icon and fill in the fields on the following screen: :
icon and fill in the fields on the following screen: :
After it will be necessary to specify the following data :
- Model : text field to define the model (Es. M001);
- Description : Text field to insert a description of the model (Es. new generation);
- Product code : Text field to insert the product code (Es. 0123456789);
- Family : use the drop-down menu to select the family to which the product belongs (Es. F001);
- Votlage Supply : use the drop-down menu to select the which voltage use the product (Es. V230Hz50);
Confirm the creation by pressing the OK key, or cancel the creation by pressing the Cancel key.
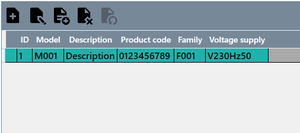
Once the new model has been created it will appear on the main window:
Model modify
To modify an already created template, select it from the list and click on the ![]() icon to access the same creation screen with the difference that the fields will already be filled in:
icon to access the same creation screen with the difference that the fields will already be filled in:
Confirm the changes by pressing the OK key or the Cancel key to cancel them.
Copy the model
To copy an already created model, select it from the list and click on the icon ![]() to access the same creation screen with the difference that the fields will already be filled in except for the template field since that field must be unique.
Confirm the copy by pressing the OK key or the Cancel key to cancel it.
to access the same creation screen with the difference that the fields will already be filled in except for the template field since that field must be unique.
Confirm the copy by pressing the OK key or the Cancel key to cancel it.
Delete Model
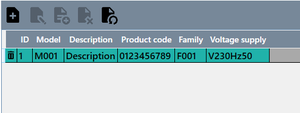
To set a model as deleted, select it from the list and click on the icon ![]() after deletion a trash can icon will appear next to the model as shown below following :
after deletion a trash can icon will appear next to the model as shown below following :
Restore model
Family
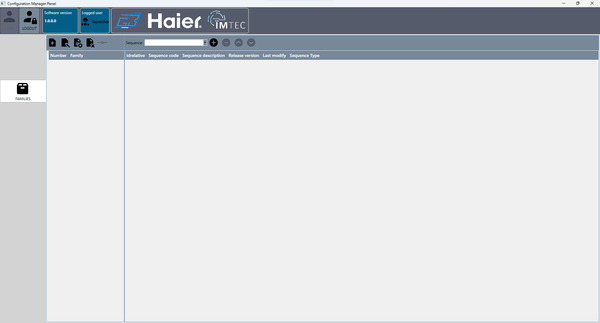
Click on the Families![]() button to access the following screen:
button to access the following screen:
The window is divided into two parts, the part on the left manages creation, modification, deletion and confirmation of modifications. The part on the right manages which sequences to associate with the family.
Below is the function of the toolbar buttons:
New Family
To create a family, click on the icon ![]() and fill in the fields on the following screen:
and fill in the fields on the following screen:

It will therefore be necessary to specify the following data:
- Family : text field to name the family (Ex. F001);
Confirm the operation by pressing the OK button.
Edit family
To modify an already created family, select it from the list and click on the ![]() icon to access the same creation screen with the difference that the fields will already be filled in.
icon to access the same creation screen with the difference that the fields will already be filled in.
Confirm the changes by pressing the OK key or the Cancel key to cancel them.
Delete family
To delete the family, select it from the list and click on the ![]() icon and confirm its deletion by pressing the Yes button on the next screen, or No to undelete.
icon and confirm its deletion by pressing the Yes button on the next screen, or No to undelete.
Confirm changes
Click on the ![]() button to confirm the changes made to the list of sequences in the right panel. If you do not confirm the changes made, they will not be saved.
button to confirm the changes made to the list of sequences in the right panel. If you do not confirm the changes made, they will not be saved.
Family Sequence
Below is the function of the toolbar buttons:
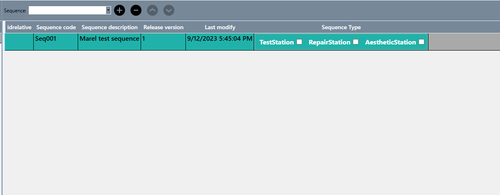
Once a sequence has been associated with the family, it will be displayed on the list as in the screen below:
For each sequence added you can select the type of sequence by selecting the square next to the type. The type of sequence is related to the type of station, in this configuration we have three models:
- Test station
- Repair Station
- Aesthetic station
After setting these options you will need to click on the key confirm changes![]() , to save them. Otherwise, if no option is selected, the sequence will not be executed during testing.
, to save them. Otherwise, if no option is selected, the sequence will not be executed during testing.
Sequences
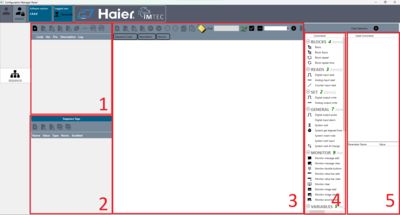
Click on the key Sequenze![]() to access the following screen :
to access the following screen :
We divide the window into five sections so that we can see how each part works individually:
Sequence management (1)
Di seguito la funzione dei tasti della toolbar :
New Sequence
To create a new sequence click on the icon ![]() to access the following screen:
to access the following screen:
It will be necessary specify the following data:
- Code: text field, sequence code, the code is unique;
- Description : text field to insert a description of the sequence;
- Log: selective field, selecting the option creates a text file at the end of the sequence execution;
Confirm the creation by pressing the OK key, or cancel the creation by pressing the Cancel key.
Edit sequence
To modify an already created sequence, select it from the list and click on the ![]() icon to access the same creation screen with the difference that the fields will already be filled in. However, the code cannot be modified to avoid losing the integrity of the data.
icon to access the same creation screen with the difference that the fields will already be filled in. However, the code cannot be modified to avoid losing the integrity of the data.
Confirm the changes by pressing the OK key or the Cancel key to cancel them.
Copy sequence
To copy an already created sequence, select it from the list and click on the icon ![]() to access the same creation screen with the difference that the fields will already be compiled, it is necessary to modify the sequence code because that is unique.
to access the same creation screen with the difference that the fields will already be compiled, it is necessary to modify the sequence code because that is unique.
Confirm the copy by pressing the OK key or the Cancel key to cancel it.
Delete sequence
To delete a sequence, select it from the list and click on the ![]() icon and confirm its deletion by pressing the Yes Key on the next screen, or No to undelete. The sequence is not totally deleted but marked as deleted. You can create another sequence with the same code, however the deleted sequence cannot be restored until the new sequence with the same code is active.
icon and confirm its deletion by pressing the Yes Key on the next screen, or No to undelete. The sequence is not totally deleted but marked as deleted. You can create another sequence with the same code, however the deleted sequence cannot be restored until the new sequence with the same code is active.
<Important note>Only one sequence can be active and the versions of it with the same code , but two different sequences must necessarily have different codes</note>
Restore Sequence
Select the sequence from the list and click on the ![]() icon to restore it. The sequence is restored only if another one has not been created with the same code.
icon to restore it. The sequence is restored only if another one has not been created with the same code.
Create new version
Click on the ![]() icon to create a new editable version of the sequence. Once a sequence has been confirmed as definitive it can no longer be modified by any user, the only way is to create a new version and this increases the value of the version going from 0 to 1, from 1 to 2 and so on .
icon to create a new editable version of the sequence. Once a sequence has been confirmed as definitive it can no longer be modified by any user, the only way is to create a new version and this increases the value of the version going from 0 to 1, from 1 to 2 and so on .
Confirm final version
To make a sequence definitive, click on the ![]() icon. Making a sequence definitive means preventing any user from making further changes to it. If you want to modify it, you need to create a new version of it.
icon. Making a sequence definitive means preventing any user from making further changes to it. If you want to modify it, you need to create a new version of it.
Export/import sequence to .json file
Click on the ![]() icon to export the selected sequence to a .json file or click on the
icon to export the selected sequence to a .json file or click on the ![]() icon to import a sequence from a .json file
icon to import a sequence from a .json file
Sequence tag management(2)
In this window we manage the tags via the toolbar. Tags are used in sequence commands, which we will see in the next chapter, as numeric or text comparison.
Below is the function of the toolbar buttons:
Nuovo tag
To create a new tag , click on the icon ![]() to open the following screen :
to open the following screen :
It will be necessary , specify the following data :
- Name : text field, tag name;
- Type : selective field, choose between numeric or text tag;
- Value: text field, sets the value of the tag, if numeric it is managed as a number otherwise as a string;
- Normalization of value a: numeric field, for normalization of values;
Edit tag
To edit an already created tag, select it from the list and click on the ![]() icon to access the same creation screen with the difference that the fields will already be filled in.
icon to access the same creation screen with the difference that the fields will already be filled in.
Confirm the changes by pressing the OK key or the Cancel key to cancel them.
Delete tag
To delete a tag, select it from the list and click on the ![]() icon and confirm its deletion by pressing the Yes button on the next screen, or No to undelete.
icon and confirm its deletion by pressing the Yes button on the next screen, or No to undelete.
<important note>Deleting a used tag in a command, makes the command incomplete and the process will fail during its execution.</note>
Enable/disable all
Click on the ![]() icon to enable normalization of all tags or click on the
icon to enable normalization of all tags or click on the ![]() to disable normalization of all tags. The tag values can be normalized to the voltage of the normalized value, for example by having a tag with name N1, value 0.3 of numeric type normalized to 220, it means that during the process when we are going to use this tag, the value 0.3 given at 220 volts, it is related to the current voltage which could perhaps vary to 218 or 230 so the limit remains consistent with the current.
to disable normalization of all tags. The tag values can be normalized to the voltage of the normalized value, for example by having a tag with name N1, value 0.3 of numeric type normalized to 220, it means that during the process when we are going to use this tag, the value 0.3 given at 220 volts, it is related to the current voltage which could perhaps vary to 218 or 230 so the limit remains consistent with the current.
Sequence command management (3)
In this window we manage the commands added to the sequence.
Below is the function of the toolbar buttons:
New command
To create a new command click on the ![]() icon or drag it from the menu(5) to access the following screen:
icon or drag it from the menu(5) to access the following screen:
It will therefore be necessary to specify the following data:
- Number : numeric field indicates the index of the command;
- Description : text field, enter the description of the command visible in the list by default takes the type of command selected as description;
- Command: selective field, select from the list which type of command to insert, each command has a further list of parameters which we see in the commands section;
- Label: text field, the label is a label that appears next to the command to make it immediately visible in the list;
- Output variable: text field, if the command provides a result this is saved in the inserted variable;
- Execution mode: select the type of command execution between normal or excluded;
Once this part has been completed, confirm the creation of the command by clicking on the OK button or cancel the operation by clicking on the Cancel button.
Edit command
To modify the command, click on the ![]() icon, it opens the same creation window but with the fields filled in. It is possible to change the command description, the command execution and the command parameters. Confirm the changes by clicking on OK or cancel the operation by clicking on Cancel.
icon, it opens the same creation window but with the fields filled in. It is possible to change the command description, the command execution and the command parameters. Confirm the changes by clicking on OK or cancel the operation by clicking on Cancel.
Copy command
To copy the selected command click on the ![]() icon, modify any parameters and confirm the copy by clicking on the OK button or cancel it by clicking on the Cancel button.
icon, modify any parameters and confirm the copy by clicking on the OK button or cancel it by clicking on the Cancel button.
Delete command
Click on the ![]() icon to delete the selected command. The action is permanent and the deleted command cannot be recovered.
icon to delete the selected command. The action is permanent and the deleted command cannot be recovered.
Move command up/down
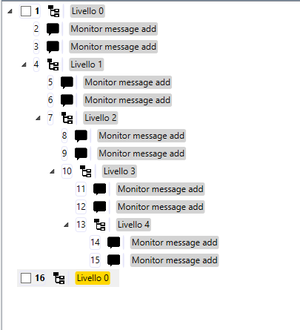
Each command can be moved one slot higher by clicking on the ![]() button, or one slot lower by clicking on the
button, or one slot lower by clicking on the ![]() button in the limit of the level of branching in the sequence tree. In the next image we have an example of a sequence with 4 levels, each command can only be moved within the same level:
button in the limit of the level of branching in the sequence tree. In the next image we have an example of a sequence with 4 levels, each command can only be moved within the same level:
Include/exclude command
To speed up the exclusion or inclusion of a command in the sequence we can use these two keys, to include a command click on the icon ![]() , to exclude a command click on the icon
, to exclude a command click on the icon ![]() . Including and excluding is simply changing the execution type of the command more quickly, instead of having to click on the command and then having to click on the edit button and then changing the execution type.
. Including and excluding is simply changing the execution type of the command more quickly, instead of having to click on the command and then having to click on the edit button and then changing the execution type.
Copy/paste selected blocks
Select the blocks you want to copy and click on the ![]() | icon. To paste the copied blocks, select a block in the sequence or another sequence and click on the
| icon. To paste the copied blocks, select a block in the sequence or another sequence and click on the ![]() icon. Pasted blocks are placed immediately after the selected one.
icon. Pasted blocks are placed immediately after the selected one.
Move label command
Click on the ![]() icon to enable moving the label between commands at the same level. After enabling this function, move the label up or down with the same keys used to move the controls.
icon to enable moving the label between commands at the same level. After enabling this function, move the label up or down with the same keys used to move the controls.
Find command and update list
In the text field, for each letter inserted, the commands that have that letter are highlighted in green. The icon ![]() was used in the past, since previously it was necessary to enter the text and then click the icon to highlight the commands, but now the search is done by each letter entered and this feature is deprecated.
was used in the past, since previously it was necessary to enter the text and then click the icon to highlight the commands, but now the search is done by each letter entered and this feature is deprecated.
Select/deselect blocks
Version
The sequence you just created is in a preview state. In this state it is possible to modify the sequence, add commands, remove them and modify them. Once confirmed as definitive, the sequence can no longer be modified and its version increases. If the sequence has multiple versions these can be retrieved and browsed via the drop-down menu.
Import version
Click on the ![]() icon to overwrite the preview sequence with one of the past versions selected from the drop-down menu.
icon to overwrite the preview sequence with one of the past versions selected from the drop-down menu.
Commands (4)
Below is the list of commands, their functions and parameters, the parameters description, command, label, output variable and execution mode are shared in all commands so they are described only in the initial blocks to avoid repetitions.
Blocks
Block: Basic block, where you can add other commands.
| Parameters | Description |
|---|---|
| Description | Block Description |
| Command | Selected command type |
| Label | Label visible next to block on display tree |
| Output variable | The result of the command, if expected, is assigned to the variable written in this field |
| Running Mode | Sets the command execution mode if normal or excluded |
Asynchronous block: Asynchronous basic block, where you can add other commands that run in parallel to the main sequence.
| Parameters | Description |
|---|---|
| Description | Block Description |
| Command | Selected command type |
| Label | Label visible next to block on display tree |
| Output variable | The result of the command, if expected, is assigned to the variable written in this field |
| Running Mode | Sets the command execution mode if normal or excluded |
Repeat block: Basic block with repetitions, where you can add other commands.
| Parameters | Description |
|---|---|
| Description | Block Description |
| Command | Selected command type |
| Label | Label visible next to block on display tree |
| Output variable | The result of the command, if expected, is assigned to the variable written in this field |
| Running Mode | Sets the command execution mode if normal or excluded |
| Repetitions | Sets how many times to execute commands within the |
| Test Mode* | Sets the mode with which to exit the repetition |
Timed repeat block: Basic block with repetitions, where you can add other commands.
| Parameters | Description |
|---|---|
| Description | Block Description |
| Command | Selected command type |
| Label | Label visible next to block on display tree |
| Output variable | The result of the command, if expected, is assigned to the variable written in this field |
| Running Mode | Sets the command execution mode if normal or excluded |
| Timer | Set in seconds, how long the block, and any subcommands, must run |
| Test Mode* | Sets the mode with which to exit the repetition |
*Test Mode : No test, commands are executed normally until the block completes. All OK, the commands are executed normally and must all be successful otherwise the block will fail and also the sequence. First OK, the commands are executed until there is a positive result, at the first positive result the block is completed and any commands not executed will not be executed and we move on to the next block in the sequence. Timeout, commands execute normally until the block completes.
Readings
Read digital input: Reads a digital input configured in the system.
| Parameters | Description |
|---|---|
| Input Channel | Select the channel you want to read from the drop-down menu |
| Result value | Select, not set if you do not want to assign the result, on if the channel signal should be high or off if the signal should be low |
| Not ok, stop | If the option is enabled, the result of the command is checked if it is correct with the result value. If it doesn't go well, the command goes into error and interrupts the sequence |
| Ok, jump to | Select from the drop-down menu the label of a command to execute if the result is ok. All commands between the two will not be executed |
| Error code | Select the error code to assign to the command from the drop-down menu |
Read analog input: Reads an analog input configured in the system.
| Parameters | Description |
|---|---|
| Input channel | Select from the drop-down menu the channel you want to read |
| Minimum value | Select from the drop-down menu the tag with the minimum value |
| Maximum value | Select from the drop-down menu the tag with the maximum value |
| Not ok, stop | If the option is enabled, the result of the command is checked to ensure that it is appropriate with the result value. If it doesn't go well, the command goes into error and interrupts the sequence |
| Ok, jump to | Select from the drop-down menu the label of a command to execute if the result is ok. All commands between the two will not be executed |
| Error code | Select from the drop-down menu the error code to assign to the command |
| Time(ms) | Sets how long to read the channel value |
| Reading mode* | Sets how to read the values from the channel |
| Reference channel | Set the reference channel in case it is necessary to process the read value based on voltage, frequency or current and save the value of that channel too |
| Additional Values | Saves all reference channels set in the system |
*Reading mode: Last, takes the last read value for the test. Average, performs an average of all the values read and takes the average to do the control. Maximum, takes the maximum value among those read to perform the check. Minimum, takes the minimum value read to perform the check.
Writings
Write digital output: Writes a digital output.
| Parameters | Description |
|---|---|
| Output channel | Select the channel you want to write from the drop-down menu |
| Value | Select it to write ON, do not select it to write OFF |
| Error code | Select from the drop-down menu the error code to assign to the command |
Write analog output: Writes an analog output.
| Parameters | Description |
|---|---|
| Output channel | Select from the drop-down menu the channel you want to write |
| Value | Select the numerical value you want to write |
| Error code | Select from the drop-down menu the error code to assign to the command |
General
Digital output pulse: lowers the signal of the selected channel to raise it after the set time
| Parameters | Description |
|---|---|
| Output channel | Select the input channel to confirm a manual OK and continue executing the next command |
| Time(ms) | Set the wait duration in milliseconds |
| Error code | Select from the drop-down menu the error code to assign to the command |
Digital input alarm : jumps to the selected label if the digital channel corresponds to the set value
| Parameters | Description |
|---|---|
| Input channel | Select from the drop-down menu the channel you want to use |
| Result value | If selected it means that the channel must be in an open state, otherwise in a closed state |
| Error code | Select from the drop-down menu the error code to assign to the command |
| Final command label | Select the label of the command to execute if the condition occurs |
| Output channel | Select from the drop-down menu, the output channel |
| Value | Sets the value of the output channel |
Wait system : Set a wait in the execution of the sequence
| Parameters | Description |
|---|---|
| Time(ms) | Set the wait duration in milliseconds |
| Input channel OK | Select the input channel to confirm a manual OK and continue executing the next command |
| Input channel KO | Select the input channel to confirm a manual NOK and stop sequence execution |
| Not ok, stop | If the option is enabled, the result of the command is checked to ensure that it is correct with the result value. If it doesn't go well, the command goes into error and interrupts the sequence |
| Error code | Select the error code to assign to the |
Calculate elapsed time : Calculates the time elapsed until this command and takes the command with the selected label as the starting point
| Parameters | Description |
|---|---|
| From command label | Select the command label from which to calculate the time elapsed until this command |
Wait for analog input (AI) status change: sets a wait state for a specific channel until its read value has changed by the set value
| Parameters | Description |
|---|---|
| Time(ms) | Set the wait duration in milliseconds |
| Input channel | Select from the drop-down menu, the channel you want to use |
| Value | Set the reference value |
| Trigger Mode* | Sets how the state change is verified |
| Not ok, stop | If the option is enabled, the result of the command is checked to ensure that it is correct with the result value. If it doesn't go well, the command goes into error and interrupts the sequence |
| Error code | Select from the drop-down menu, the error code to assign to the command |
*Trigger mode: Relative, the value read by the channel must increase at least by the set value, greater than or equal if the value read by the channel is greater or equal to the set value, less than or equal the value read by the channel must be less or equal to the set value.
Screen
Add message on screen: adds a message to display to the operator
| Parameters | Description |
|---|---|
| Operator message | Sets the message to appear to the operator |
| Variable | Select the variable to be shown together with the message (not mandatory) |
| Variable text format | {0} is replaced with the value of the variable |
Clear messages on screen: removes either all or just the last message viewed
| Parameters | Description |
|---|---|
| Clean all | If selected, it removes all the messages that appeared on the screen, otherwise only the last one added |
Double button screen: adds a message to the screen and the operator must interact with the message by giving ok or ko
| Parameters | Description |
|---|---|
| Operator message | Sets the message to appear to the operator |
| Text on OK button | Set the text displayed on the confirm button |
| Text on the KO button | Sets the text displayed on the button to not confirm |
| Time(s) | Set in seconds, how much time the operator has to select OK or KO |
| Input channel for OK | Select the input channel to read to give OK |
| Entry channel for the KO | Select the input channel to read to KO |
| Not ok, stop | If the option is enabled, the result of the command is checked to ensure that it is consistent with the result value. If it doesn't go well, the command goes into error and interrupts the sequence |
| Error code | Select from the drop-down menu the error code to assign to the command |
Add horizontal bar on the screen: adds a bar to the screen by linking it to a variable, displays a bar with the minimum and maximum value and the value of the variable varies on the bar in real time
| Parameters | Description |
|---|---|
| Minimum value | Select from the drop-down menu the tag with the minimum value |
| Maximum value | Select from the drop-down menu the tag with the maximum value |
| Input variable | Set the variable to check |
| Variable text format | {0} is replaced with the value of the variable |
Clear horizontal bar on screen: removes either all or only the last bar displayed
| Parameters | Description |
|---|---|
| Clean all | If selected it removes all the bars visible on the screen, otherwise only the most recently added |
Clear screen: removes everything visible on the screen, messages, bars.
Add image to screen: adds an operator message and an image
| Parameters | Description |
|---|---|
| Operator message | Sets the message to appear to the operator |
| Image | Select an image from the drop-down menu of those created in the images section |
Clean screen images: removes either all or only the last image displayed
| Parameters | Description |
|---|---|
| Clean all | If selected it removes all images visible on the screen, otherwise only the most recently added |
Add anomaly: displays the set image during the test phase and the possibility of adding previously created anomalies
| Parameters | Description |
|---|---|
| Operator message | Sets the message to appear to the operator |
| Image | Select an image from the drop-down menu of those created in the images section |
Variables
Test Boolean variable: performs a true or false test on the selected variable
| Parameters | Description |
|---|---|
| Input variable | Set the variable to check |
| Result value | If selected, the result of the variable must be equal to true for the command to be ok, otherwise the result must be false for the command to be ok |
| Not ok, stop | If the option is enabled, the result of the command is checked to ensure that it is corresponding with the result value. If it doesn't go well, the command goes into error and interrupts the sequence |
| Ok, jump to | Select from the drop-down menu the label of a command to execute if the result is ok. All commands between the two will not be executed |
| Error code | Select from the drop-down menu the error code to assign to the command |
Test variable value : performs a test on the value of the selected variable
| Parameters | Description |
|---|---|
| Input variable | Set the variable to check |
| Minimum value | Select from the drop-down menu the tag with the minimum value |
| Maximum value | Select from the drop-down menu the tag with the maximum value |
| Not ok, stop | If the option is enabled, the result of the command is checked to ensure that it is corresponding with the result value. If it doesn't go well, the command goes into error and interrupts the sequence |
| Ok, jump to | Select from the drop-down menu the label of a command to execute if the result is ok. All commands between the two will not be executed |
| Ok, if it doesn't match | If enabled, it sets the result to OK when the read value is not between the minimum and maximum |
| Error code | Select from the drop-down menu the error code to assign to the command |
Test variable value AND: performs a bitwise test based on the input variable and the set value
| Parameters | Description |
|---|---|
| Input variable | Set the variable to check |
| Value | Value used for the bitwise AND operation |
| Not ok, stop | If the option is enabled, the result of the command is checked to ensure that it is corresponding with the result value. If it doesn't go well, the command goes into error and interrupts the sequence |
| Ok, jump to | Select from the drop-down menu the label of a command to execute if the result is ok. All commands between the two will not be executed |
| Ok, if it doesn't match | If enabled, it sets the result to OK when the read value is not between the minimum and maximum |
| Error code | Select from the drop-down menu, the error code to assign to the command |
Compare variables: compare the first selected variable with the second, the interval is calculated only on the second variable
| Parameters | Description |
|---|---|
| Input variable | Sets the variable to be monitored as the first comparison term |
| Comparison operator | From the drop-down menu, select the operator for the comparison, whether it must be equal to, greater than, greater than or equal to, less than or less than or equal to |
| Range +/- | Sets a range for the second comparison variable |
| Input variable | Sets the variable to be monitored as the second comparison term |
| Not ok, stop | If the option is enabled, the result of the command is checked to ensure that it is consistent with the result value. If it doesn't go well, the command goes into error and interrupts the sequence |
| Ok, jump to | Select from the drop-down menu the label of a command to execute if the result is ok. All commands between the two will not be executed |
| Ok, if it doesn't match | If enabled, it sets the result to OK when the read value is not between the minimum and maximum |
| Error code | Select the error code to assign to the |
Difference between variables: Controls the difference of the first variable and the second variable and must be within the range if min and max are set or greater than the minimum if only the minimum is set or less than the maximum if only the maximum is set
| Parameters | Description |
|---|---|
| Input variable | Set the variable to check as minuend |
| Input variable | Set the variable to check as subtracting |
| Minimum value | Select from the drop-down menu, the tag with the minimum value |
| Maximum value | Select from the drop-down menu, the tag with the maximum value |
| Not ok, stop | If the option is enabled, the result of the command is checked to ensure that it is consistent with the result value. If it doesn't go well, the command goes into error and interrupts the sequence |
| Ok, jump to | Select from the drop-down menu the label of a command to execute if the result is ok. All commands between the two will not be executed |
| Error code | Select from the drop-down menu, the error code to assign to the command |
Devices
Read value from device: similar to reading the analog channel
| Parameters | Description |
|---|---|
| Input Device | Select from the drop-down menu, the device from which to read |
| Minimum value | Select from the drop-down menu, the tag with the minimum value |
| Maximum value | Select from the drop-down menu, the tag with the maximum value |
| Not ok, stop | If the option is enabled, the result of the command is checked to ensure that it is corresponding with the result value. If it doesn't go well, the command goes into error and interrupts the sequence |
| Ok, jump to | Select from the drop-down menu, the label of a command to execute if the result is ok. All commands between the two, will not be executed |
| Ok, if it doesn't match | If enabled, it sets the result to OK when the read value is not between the minimum and maximum |
| Error code | Select the error code to assign to the |
| Time(ms) | Sets how long to read the channel value |
| Reading mode* | Sets how to read the values from the channel |
Write value to device: Similar to the analog write command
| Parameters | Description |
|---|---|
| Output Device | Select from the drop-down menu, the output device |
| Value | Set the value to write to the device |
| Error code | Select from the drop-down menu, the error code to assign to the command |
Device Function Command: Send a command to a compatible device.
| Parameters | Description |
|---|---|
| Device command | Select the command to send from the drop-down menu |
| Command parameters (separated by ; ) | Set the parameters of the command, each parameter must be divided by a ; |
| Minimum value | Select from the drop-down menu, the tag with the minimum value |
| Maximum value | Select from the drop-down menu, the tag with the maximum value |
| Accepted string value | Select from the drop-down menu, the string value that can be accepted as a response from the command |
| String comparison method | Select from the drop-down menu which comparison method to use |
| Not ok, stop | If the option is enabled, the result of the command is checked to ensure that it is corresponding with the result value. If it doesn't go well, the command goes into error and interrupts the sequence |
| Ok, jump to | Select from the drop-down menu the label of a command to execute if the result is ok. All commands between the two will not be executed |
| Ok, if it doesn't match | If enabled, set the result to OK when the read value is not between the minimum and maximum or the string does not match |
| Error code | Select from the drop-down menu, the error code to assign to the command |
Security test
Insulation test
| Parameters | Description |
|---|---|
| Safety device | Set the security device to use |
| Not ok, stop | If the option is enabled, the result of the command is checked to ensure that it is consistent with the result value. If it doesn't go well, the command goes into error and interrupts the sequence |
| Error code | Select from the drop-down menu the error code to assign to the command |
PE Test
| Parameters | Description |
|---|---|
| Safety device | Set the security device to use |
| Not ok, stop | If the option is enabled, the result of the command is checked to ensure that it is consistent with the result value. If it doesn't go well, the command goes into error and interrupts the sequence |
| Error code | Select from the drop-down menu, the error code to assign to the command |
Functional test
| Parameters | Description |
|---|---|
| Safety device | Set the security device to use |
| Not ok, stop | If the option is enabled, the result of the command is checked to ensure that it is consistent with the result value. If it doesn't go well, the command goes into error and interrupts the sequence |
| Error code | Select from the drop-down menu, the error code to assign to the command |
Additional
| Parameters | Description |
|---|---|
| Safety device | Set the security device to use |
| Not ok, stop | If the option is enabled, the result of the command is checked to ensure that it is consistent with the result value. If it doesn't go well, the command goes into error and interrupts the sequence |
| Error code | Select from the drop-down menu, the error code to assign to the command |
High voltage AC test
| Parameters | Description |
|---|---|
| Safety device | Set the security device to use |
| Not ok, stop | If the option is enabled, the result of the command is checked to ensure that it is consistent with the result value. If it doesn't go well, the command goes into error and interrupts the sequence |
| Error code | Select from the drop-down menu, the error code to assign to the command |
Visual
| Parameters | Description |
|---|---|
| Safety device | Set the security device to use |
| Not ok, stop | If the option is enabled, the result of the command is checked to ensure that it is consistent with the result value. If it doesn't go well, the command goes into error and interrupts the sequence |
| Error code | Select from the drop-down menu, the error code to assign to the command |
Dispersion test
| Parameters | Description |
|---|---|
| Safety device | Set the security device to use |
| Not ok, stop | If the option is enabled, the result of the command is checked to ensure that it is consistent with the result value. If it doesn't go well, the command goes into error and interrupts the sequence |
| Error code | Select from the drop-down menu, the error code to assign to the command |
Aesthetics
Add anomaly: displays the image during the test phase and the possibility of adding anomalies to the selected boxes
| Parameters | Description |
|---|---|
| Defects table | composed of 12 blocks, select the ones to which you want to add a defect during the testing phase, the others will not be visible if not enabled |
| Image | Select an image from the drop-down menu of those created in the images section |
Quick Commands (5)
In the Quick Commands panel, all commands of the same type selected in section (4) used in other sequences are displayed. If this is dragged into the sequence, the fields already filled in based on the command taken are displayed in the channel creation panel. The parameters are displayed in the panel below.
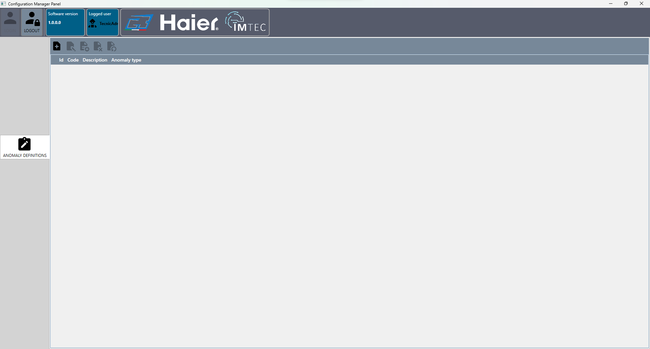
Anomaly definitions
Click on the Anomaly definitions![]() button to access the following screen:
button to access the following screen:
Below is the function of the toolbar buttons:
New anomaly
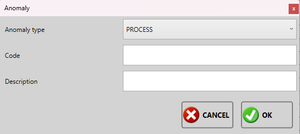
To create an anomaly, click on the ![]() icon and fill in the fields on the following screen:
icon and fill in the fields on the following screen:
It will therefore be necessary to specify the following data:
- Type of anomaly: select the type from the drop-down menu between aesthetic, process, product and safety;
- Code : text field, enter a code for the anomaly;
- Description : text field, enter a description of the anomaly;
Confirm the operation by pressing the OK button or cancel it by clicking the Cancel button.
Edit anomaly
To modify an anomaly already created, select it from the list and click on the icon ![]() to access the same creation screen with the difference that the fields will already be filled in .
to access the same creation screen with the difference that the fields will already be filled in .
Confirm the changes by pressing the OK key or the Cancel key to cancel them.
Copy anomaly
To copy an anomaly already created, select it from the list and click on the icon ![]() to access the same creation screen with the difference that the fields will be already filled out.
to access the same creation screen with the difference that the fields will be already filled out.
Confirm the copy by pressing the OK key or the Cancel key to cancel it.
Eliminate anomaly
To set an anomaly as deleted, select it from the list and click on the icon ![]() after deletion a trash can icon will appear next to the item in the list.
after deletion a trash can icon will appear next to the item in the list.
Restore anomaly
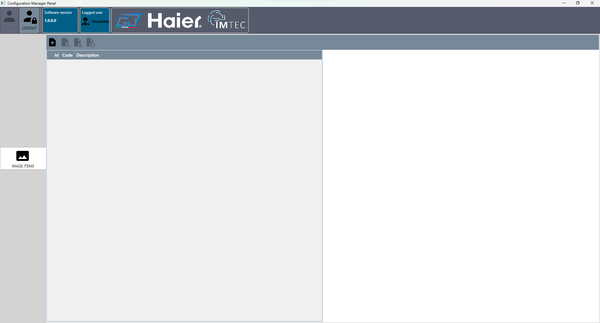
Image items
Click on the Images items![]() button to access the following screen:
button to access the following screen:
Below is the function of the toolbar buttons:
New image
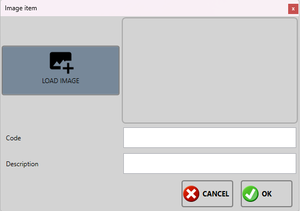
To create an image, click on the ![]() icon and fill in the fields on the following screen:
icon and fill in the fields on the following screen:
It will therefore be necessary to specify the following data:
- Load Image: button to select an image from your computer, once selected you will see the preview in the next box;
- Code : image code;
- Description : description of the image;
Confirm the operation by pressing the OK key or cancel the creation by pressing the Cancel key.
Edit image
To edit an image already created, select it from the list and click on the ![]() icon to access the same creation screen with the difference that the fields will already be filled in.
icon to access the same creation screen with the difference that the fields will already be filled in.
Confirm the changes by pressing the OK key or the Cancel key to cancel them.
Delete image
To set an image as deleted, select it from the list and click on the icon ![]() after deletion a trash can icon will appear next to the item in the list.
after deletion a trash can icon will appear next to the item in the list.
Restore image
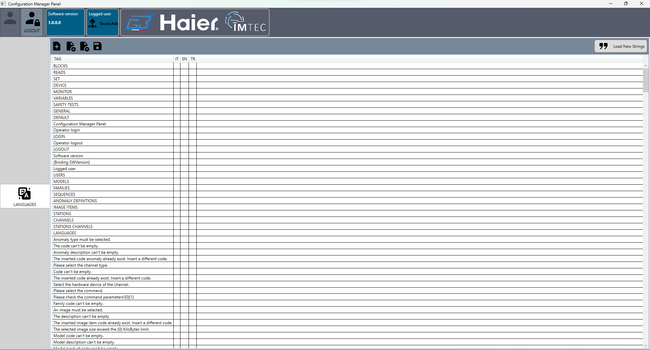
Languages
Click on the Languages button ![]() to access the following screen:
to access the following screen:
Below is the function of the toolbar buttons:
For language management we use .po files which are standard text files for this function. They can be opened with software such as notepad, notepad++ etc… To change the language of the program simply write the code of the language you prefer in the configuration file/>
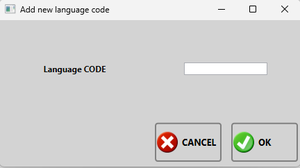
New language
To create a new code for a language, click on the ![]() icon and fill in the only field on the following screen:
icon and fill in the only field on the following screen:
It will therefore be necessary to specify the following data:
- Language CODE: text field, identification code to select that translation;
Confirm the operation by pressing the OK key or cancel the creation by pressing the Cancel key.
Import .po file
To import an external .po file click on the Import![]() button and select it via the window. The file that is imported creates a new language code if it is not already present in the language management and automatically imports all the translations that correspond to the TAG table.
button and select it via the window. The file that is imported creates a new language code if it is not already present in the language management and automatically imports all the translations that correspond to the TAG table.
Export .po file
Click on the Export .po file![]() button to open the window and select the folder where you want to create the .po files for each created language. In our case by default we have IT,EN,TR which means that by exporting the table, an it.po, en.po and tr.po file are created for each code.
button to open the window and select the folder where you want to create the .po files for each created language. In our case by default we have IT,EN,TR which means that by exporting the table, an it.po, en.po and tr.po file are created for each code.
<important note>If the translations are not complete, the attached text fields will not be visible, and some program windows may be incomplete </note>
Load new TAGS
To load new sentences click on the Load new sentences button![]() . The new sentences are present under the TAG column and it is necessary to request the updated file from Marel otherwise this function always reloads the same ones without updating anything.
. The new sentences are present under the TAG column and it is necessary to request the updated file from Marel otherwise this function always reloads the same ones without updating anything.
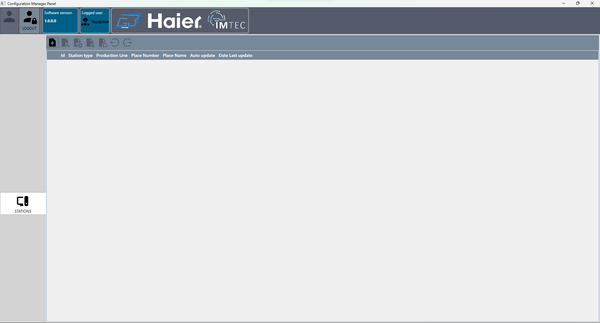
Stations
Click on the Stations![]() button to access the following screen:
button to access the following screen:
Below is the function of the toolbar buttons:
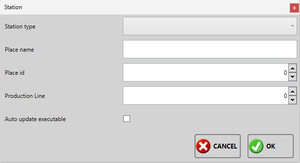
New station
To create a new station, click on the ![]() icon and fill in the fields on the following screen:
icon and fill in the fields on the following screen:
It will therefore be necessary to specify the following data:
- Station type : drop-down menu, to select the type of station, Test station,Repair station,Aesthetic station,;
- Place name : descriptive field, name of the station;
- Place id : numerical field incremental by 1, sets the station number;
- Production line : numeric field incremental by 1, sets the production line number;
- Auto update executable: selective field, if selected it sets that the station automatically updates its software when an update is present;
Confirm the operation by pressing the OK key or cancel the creation by pressing the Cancel key.
Edit station
To modify an already created station, select it from the list and click on the ![]() icon to access the same creation screen with the difference that the fields will already be filled in.
icon to access the same creation screen with the difference that the fields will already be filled in.
Confirm the changes by pressing the OK key or the Cancel key to cancel them.
Copy station
To copy an already created station, select it from the list and click on the icon ![]() to access the same creation screen with the difference that the fields will already be filled out.
to access the same creation screen with the difference that the fields will already be filled out.
Confirm the creation of a new station by clicking on the OK button or cancel the operation by clicking on the Cancel button.
Delete station
To set a station as deleted, if it is no longer present in the production line, select it from the list and click on the icon ![]() which will appear after deletion a trash can icon next to the station.
which will appear after deletion a trash can icon next to the station.
Restore station
To restore a deleted station and remove the deleted status, select it from the list and click on the ![]() icon.
icon.
Disable station
To disable a station press the icon ![]() , the disabled station will not receive any product to test on the production line.
, the disabled station will not receive any product to test on the production line.
Enable station
To re-enable a station press the icon ![]() , the disabled station will not receive any products to test on the production line.
, the disabled station will not receive any products to test on the production line.
Channels
Click on the Channels button ![]() to access the following screen:
to access the following screen:
Below is the function of the toolbar buttons:
All created channels will be shared between created stations, so you need to go to Stations channels to properly configure the channels for each station.
<important note> The system is supplied already configured by Marel. </note>
New channel
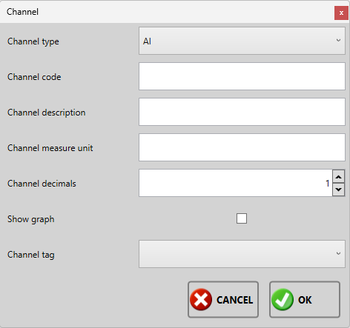
To create a channel, click on the icon ![]() and fill in the fields on the following screen:
and fill in the fields on the following screen:
It will therefore be necessary to specify the following data:
- Channel type: selective field, select from the drop-down menu which type of channel to create, among AI, AO, CNT, CUSTOM, DEVICE IN, DEVICE OUT, DI, C, SAFETY;
- Channel code : text field, channel code;
- Channel description : text field, channel description;
- Channel measure unit : text field, channel measurement unit;
- Channel decimals : numeric field, number of decimal units to use and show;
- Show graph: selective field, if selected this channel will be visible on the graph during the test, the graph is accessible only to TECNIC ADMIN and ADMIN users;
- Channel tag: selective field, select from the drop-down menu the tag to associate with the channel between Sampling ampere, sampling voltage, sampling power, sampling frequency , this tag is used to set the channel as a reference channel if we need to use amperes, voltage, frequency or power in calculations and mathematical formulas;
Confirm the operation by pressing the OK key or cancel the creation by pressing the Cancel key.
Edit channel
To edit an already created channel, select it from the list and click on the icon ![]() to access the same creation screen with the difference that the fields will already be filled in.
to access the same creation screen with the difference that the fields will already be filled in.
Confirm the changes by pressing the OK key or the Cancel key to cancel them.
Copy channel
To copy an already created channel, select it from the list and click on the icon ![]() to access the same creation screen with the difference that the fields will already be filled out.
to access the same creation screen with the difference that the fields will already be filled out.
Confirm the creation of the new channel by pressing the OK button or cancel the operation by clicking on the Cancel button.
Delete channel
To delete a channel, select it from the list and click on the icon ![]() and confirm its deletion by pressing the Yes button on the next screen, or No to undelete.
and confirm its deletion by pressing the Yes button on the next screen, or No to undelete.
Stations channel
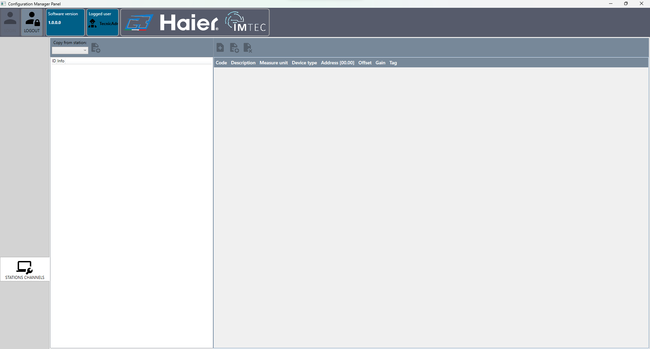
Click on the Stations channel![]() button to access the following screen:
button to access the following screen:
The window is divided into two parts. On the left we have the list of previously created stations, while on the right we have the list of all the channels created.
Copy from station
Below is the function of the buttons on the left panel toolbar:
By clicking on the button to copy the configuration a confirmation window appears, to confirm the copy click on the Yes button to cancel the copy click on the No button. If the station selected from the drop-down menu and the station selected in the list are the same, the button will not be enabled.
Station channel management
Below is the function of the buttons on the right panel toolbar:
Edit station channel
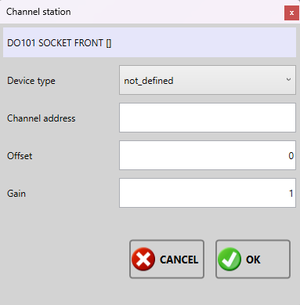
To edit a station channel, select it from the list and click on the ![]() icon to access the following screen:
icon to access the following screen:
It will therefore be necessary to specify the following data:
- Device type: selective field, select from the drop-down menu which type of device the channel belongs to;
- Channel address : text field composed of two parts dd.cc , replace dd with the device id and cc with the device channel id;
- Offset : Sets an offset for use in mathematical formulas and data processing;
- Gain : Sets a gain for use in mathematical formulas and data processing;
Confirm the changes by pressing the OK key or the Cancel key to cancel them.
<important note>The system is supplied already configured by Marel, the end user does not need to configure any channels</note>
Copy/Paste station channel
Select a channel from the list and click on the icon ![]() to copy the channel. Once the channel has been copied, select another channel from the list to be able to paste it. When a channel is pasted, the same creation window opens but with the data of the copied channel. Modify the desired fields and complete the operation by clicking the OK button or cancel the operation by clicking the Cancel button. Once the operation has been cancelled, you need to copy the channel again by selecting it again and clicking on the copy button again.
to copy the channel. Once the channel has been copied, select another channel from the list to be able to paste it. When a channel is pasted, the same creation window opens but with the data of the copied channel. Modify the desired fields and complete the operation by clicking the OK button or cancel the operation by clicking the Cancel button. Once the operation has been cancelled, you need to copy the channel again by selecting it again and clicking on the copy button again.
Delete station channel
To delete a channel, select it from the list and click on the icon ![]() this operation resets the type of associated device, the channel address, the offset and the gain. Confirm the deletion by clicking Yes or cancel it by clicking No.
this operation resets the type of associated device, the channel address, the offset and the gain. Confirm the deletion by clicking Yes or cancel it by clicking No.
Use of the program: archive management
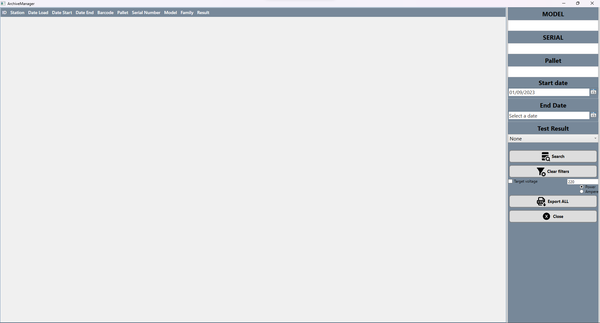
Let's see the function of the program archive management. The program is used to browse all the tests performed and export them to process the data with third-party software. When the program starts we access the following screen:
To search for tests performed, fill in the data on the side of the page. As filters we have:
- Model : text field, insert the complete model or part of it
- Serial: text field, enter the complete serial or part of it
- Pallet : text field, enter the complete pallet or part of it
- Start date: date field, select the date from which to start the search, the selected date is included in the search
- End date: date field, select the date from which to end the search, the selected date is included in the search
- Test result : selective field, select the test result to search for
Below is the function of the keys:
In the list of tests it is possible to open a drop-down menu by clicking with the right mouse button, the options are:

- Show test values: Opens a new window where it shows the values read during the test, all readings;
- Export values to .csv: Exports all selected tests to a .csv file;
- Show variable values: Opens a new window where it shows the values of all test variables.
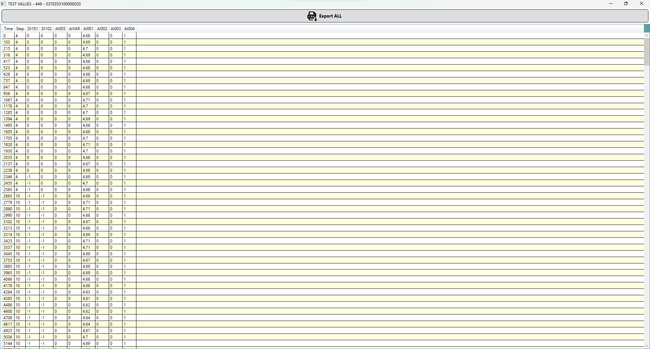
Show values
Right-click on the test and select show values to access the following screen:
On this screen you can see all the values read during the test. This data is raw without any calculation as it is read by the acquisition devices so it is reported on the screen and can be exported in “csv” format by clicking on the icon {{:icons8:icons8-export-csv-96.png?32|} } Export all.
Show variables
Right-click on the test and select show variables to access the following screen:
In this screen you can see the test variables during the execution of the process and the value read.
Use of the program: station management
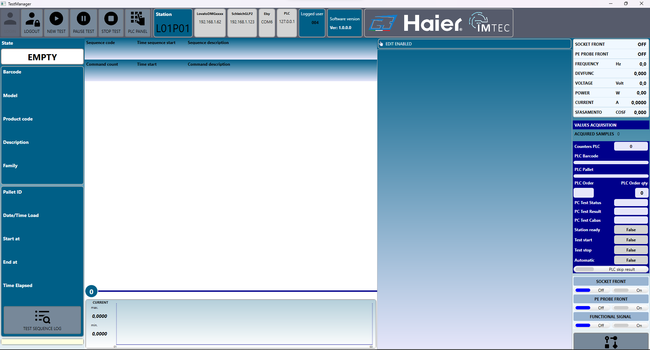
Start the station management program to access the following screen:
If you enter via the login button with a technical administrator user, the main screen presents more information as follows:
Below is the function of the toolbar buttons:
Following the functional keys we also have a block for each device configured in the system and a block for the connected user.


