Introduction
This manual describes the procedures for the proper use of the software GasTapsTestSystem supplied with the taps test system .
Gas Taps Test System
This system has been designed and developed for the acquisition of values of torque, pressure (*) nd temperature of the taps during the rotation in the two directions: anticlockwise and clockwise. During the testing phase the torque curves detected are plotted and are saved components with peak values over a maximum threshold set. or each slot, the system is further equipped with four digital inputs for reading as many contacts during the phases of handling.
Settings and configuration
This chapter describes how to install and configure the program and acquisition of all components and drivers necessary.
The information contained in this section are helpful only for a possible replacement of the PC or in the case of a new installation of the operating system Windows XP / Windows 7.
Installing the capture card ADVANTECH
The drivers are automatically installed with the setup program as described in the next paragraph. When the installation is completed, you can turn off the computer to insert the card. After restart of the computer, proceed with the setup of analog channels via the program Advantech Device Manager specifying the mode “single-ended” or “differential” (*).
Application installation
The procedure for installing the program is as follows:
- Insert the installation CD-ROM supplied with the system in the CD player;
- Start the setup program Setup GasTapsEnhTestSystem x.xx;
- Leave the default settings and wait for the completion of the installation procedure.
Program settings (serial port connected to the oven, the header of the client etc …) are shown in a configuration file as described in the next paragraph.
Application configuration
During the installation automatically creates the configuration file GasTapsTastSystem.exe.config with the correct settings. However if you need to make some changes (customer name, serial communication etc …) you can open the file with any text editor such as Windows Word Pad.
The content of the file is as follows:
<?xml version="1.0" encoding="utf-8" ?>
<configuration>
	<appSettings>
		<!--lingua utilizzata nell'applicazione:it,es-->
		<add key="LINGUA" value="es"></add>
		<!--seriale di comunicazione con il forno (""=non collegato)-->
		<add key="COMM_FORNO" value="1"></add>
		<!--seriale di comunicazione con le PM110 (""=non collegate)-->
		<add key="COMM_PM110" value="3"></add>
		<!--ID della scheda advantech. Vedere advantech DeviceManager (-1=disabilitata)-->
		<add key="BOARD_ADVANTECH" value="0"></add>
		<add key="ADVANTECH_AI_DIFFERENZIALI" value="1"></add>
		<!--seriale di comunicazione con il modulo ADAM 4018 se previsto (""=non collegato)-->
		<add key="COMM_ADAM_4018" value=""></add>
		<!--movimantazione assiale-->
		<add key="MOVIMENTAZIONE_ASSIALE" value="1"></add>
		<!--1=abilita la lettura degli ingressi-->
		<add key="INGRESSI_ABILITATI" value="1"></add>
		<!--generalità del cliente e nome sistema-->
		<add key="CLIENTE" value="COPRECI"></add>
		<add key="SISTEMA" value="GAS TAPS TEST SYSTEM"></add>
		<!--1=abilita la lettura della pressione (ulteriore ingresso Analogico per ogni rubinetto)-->
		<add key="PRESSIONE_ABILITATA" value="0"></add>
		<!--posizione prima postazione("DX" o "SX")-->
		<add key="POSIZIONE_PRIMA_POSTAZIONE" value="DX"></add>
		<!--presenza braccetto apertura porta-->
		<add key="APERTURA_FORNO" value="1"/>
		<!--secondi impiegati nella movimentazione della porta-->
		<add key="TEMPO_APERTURA_FORNO" value="12"/>
	</appSettings>
</configuration>
Starting the program
To start the application, select the command Start » Programs » MAREL » GasTapsTestSystem or double-click on the desktop icon GasTapsEnhTestSystem.
Close application
Select File » Exit from the menu or ALT + F4 or simply the following button in the toolbar:
click on Yes button or press ENTER to the next confirmation message.
User interface
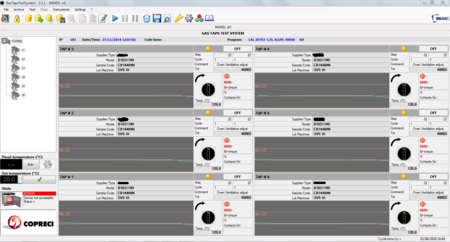
Main screen is as follows:
The top bar displays the title of the application and contains three buttons for resizing and closing the program (refer to the operating system installed on your computer).
Are located immediately below the Menu bar and Toolbar.
On the left there is the List of places and testing and Panel of the oven.
Depending on your selection in the list of places, in the center of main screen will be displayed the Place of the panel or the Graphics area.
The statusbar placed in the bottom of the window, displays the current date and time without necessarily show the standard applicationbar of windows.
Menu bar
From the menu bar you can access all the functions provided by the test program. These functions can be selected with the mouse or keyboard, press the Alt key and then the underlined letter of the command chosen. The most-used can also be activated via a function key or a key combination as shown in the next menu.
The following table summarizes all the menu commands:
| Commands Menu | Description | Shortcut |
|---|---|---|
| File | ||
| –> Events | See the list of recorded events | CTRL + L |
| –> Advanced instruments | View advanced functions for calibration | |
| –> Exit | Closes the application | ALT + F4 |
| Archive | ||
| –> Components | View the components Database | F2 |
| –> Advanced programs | View the advanced programs Database | F3 |
| –> Programmi standard | Visualizza l'archivio dei programmi standard | F4 |
| –> Tests | View the tests Database | F9 |
| –> External tests | View the list of tests stored in another location or unit | ALT + F9 |
| –> Close | Closes an open test from the archive | CTRL + C |
| –> Backup | Start the backup utility of tests | |
| Test | ||
| –> New | Create a new test | CTRL + N |
| –> Repeat | Start a new test with the same settings as the last runned | CTRL + R |
| –> Modify | Change the setting of a test | CTRL + M |
| –> Start | Start / Resume a test | F5 |
| –> Suspend | Suspend a test | F6 |
| –> Suspend and unlock | Suspend a test and unlocks motors | |
| –> Delete | Delete a test | |
| –> Save | Save a test in the Database | |
| –> Details | View details of the program of the selected place | CTRL + D |
| –> Value max | Displays the maximum values diagram | CTRL + V |
| –> Result | Displays the window for entering / editing a possible result | CTRL + E |
| Place | ||
| –> Calibrate | Displays the calibration of the torque for the selected place | |
| –> Save and continue | Save the data of the place and continues testing with the remaining | |
| –> Exclude and continue | Deletes data of the place and continues testing with the remaining | |
| Instruments | ||
| –> Install components | Opens the panel for manual management of places | F8 |
| –> Input calibrator | (optional) Opens the panel for the calibration of the thermocouples detection temperatures | |
| –> Calibration | (advanced) Opens the panel for calibration and diagnosis of the analog inputs | |
| –> Password | Enable / Disable functions administrator, password protected | |
| Settings | ||
| –> Drawing | View / Edit graph settings | F10 |
| –> Option | Opens the settings panel program | F11 |
Toolbar
The toolbar contains buttons for quick access to some of the menu commands:
List places and tests
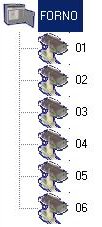
The tree list displays the oven and its places. Selecting the oven, the program displays the “Panel places”, instead selecting a place displays its data with the list of acquired curves and graph acquisition eventually selected “Graphic Area”.
Any other tests reopened from the archive are appended and are represented by a different image:
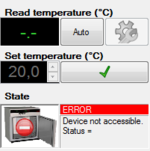
Oven panel
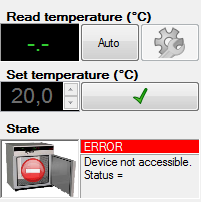
Read Temperature (°C)
Displayed the internal temperature detected by the sensor of the oven.
Set Temperature (°C)
The temperature threshold is manually setted. It is enabled only if the Manual mode is selected.
State
It indicates the mode of operation and the status of the serial communication, accompanied by an icon corresponding .:
- ONLINE–AUTO;
- ONLINE–MANUAL;
- ERROR.
If you receive the error status in the box below there is also a description explaining the problem.
To learn about the key functions go to the section Options oven.
Panel places
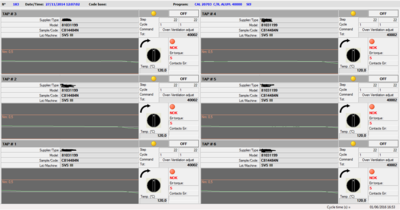
The panel of the places provides an overview of system status while displaying all the pitches of testing:
Above, common to all places,are displayed the date / Start time testing, the test description and test program. Just below for each location the informations displayed are:
- In the top left corner there is the number for the place and to the right a colored light and a label that indicate the status as summarized in the following table:
| Status List Place | ||
|---|---|---|
 | EMPTY | Place not in testing |
 | OFF | Place with a test not in execution |
 | ON | PPlace with a test in execution |
 | ERR | Communication error with the hardware place |
- Just below displays the supplier/type, model and sample / code / ANC relating to the component. Depending on the type of running program also shows the following details of the test:
- Standard program: current step, total step, the current cycle, total cycles and absolute counter cycle running;
- Advanced program: current block, total block, current command, total command and the command name running;
- Lower down you see the graphic and an arrow pointing to the right or left , based on the last rotation performed. Just below ,the temperature of the detection and the pressure exerted on the component. To the right, a red icon or a green icon and labeled “OK”, “KO” indicating the presence of possible errors in the below data.
Graphic Area
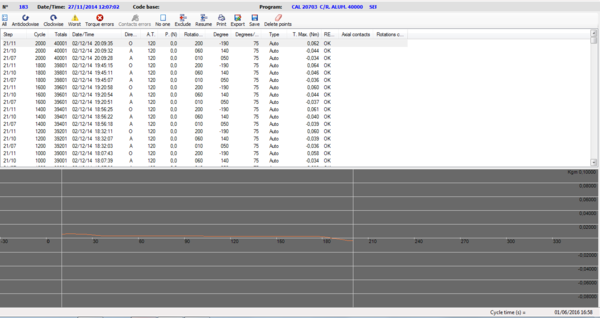
Selecting the list of test a single place, the program shows a list of the curves acquired and the graph of the measured values acquired:
In the top bar are shown the following keys:
| Tools for the Graphic Area | |
|---|---|
| | Displays all the curves acquired |
| | Displays all the curves measured counterclockwise |
| | Displays all the curves measured clockwise |
| | Displays the curves with higher pick value obtained during the rotation |
| | Select the wrong curves. While pressing the SHIFT + CTRL activates the delete function curves erroneously detected |
| | Cancel selection of the curves |
| | Excludes the selected curves from the report print |
| | Delete the exclusion of previously selected curves “Excluded” |
| | Print a report of selected curves |
| | Export as text format all the values of selected curves |
| | Save the graph displayed as image format JPEG |
| | Delete the points plotted on the graph |
In the list, for each curve detected, there are visible the following information:
- the step number or the combination lock / command in the case of an advanced programming;
- the number of the cycle in reference to the step or block;
- detection time and date;
- the direction: O for clockwise rotation, A for counterclockwise rotation;
- the temperature detected at the end of rotation (*);
- the pressure measured at the end of rotation;
- the start of rotation (expressed in degrees);
- degrees done;
- the rotation speed (expressed in degrees per second);
- the type of curve that can be “Auto” for curves stored according to the settings of the testing program otherwise empty for other saved because with negative results;
- the maximum value of torque (Nm);
- result of the curve;
- the number of detected contacts (for input 1) in axial movement;
- the number of detected contacts (for the inputs 2,3,4) during the phase of rotation.
The curves with negative results, whether for exceeding the rated value in the detection of the torque or for problems in contacts, they are shown in red. The curves Excluded, with its button is highlighted with a gray background.
The bottom panel shows the curves relating to the testing in question. The scale of the torque expressed in Newtons or Kilograms is arranged vertically, the degree scale is drawn horizontally. Pressing the left button of the mouse, over the graphic,a point is inserted at that displays with the torque value detected (if enabled in the graphics settings, in brackets are visible degrees of location). Holding down the right button you can instead quickly reviewing the torque values that are displayed next to a vertical bar traced continuously at the mouse.
Selecting a single curve, the program displays two vertical bars enclosing the part examined for the detection of torque errors. The position of the bars is related to the degree of tolerance set in the program options at the time of the testing.
Test
In this section we will explain all the operations that can be performed during the test phases: start, pause, resume, modify, deleting and saving.
New
To begin the phase of rotation and acquisition of the torque we need to create a test. Select in the menu Test » New or hold the key CTRL+N; or simply, press the following button in the toolbar:
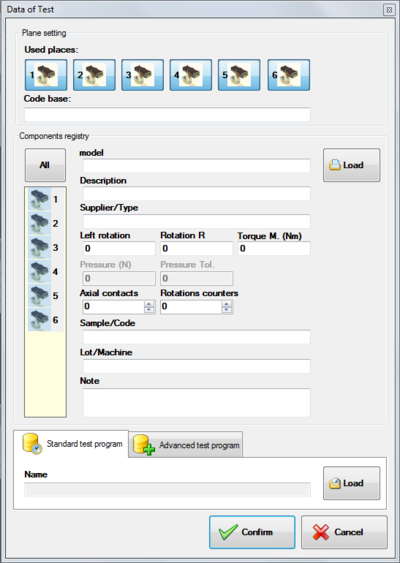
The program displays the interface for input of data relating to the test to be performed:
We have to select the places on which the testing will be performed, then press on the icons of the taps in the upper panel to enable or disable. If necessary, but not required for the purposes of test, enter a description of the test and subsequently for each component include the following information: Supplier / Type, Model, Description, Rotation Left (degrees), Rotation Right, Torque max (Nm), Pressure (N), Pressure tolerance (N), Contacts axial and Rotation counters. To load data from the components archive, select all the locations listed in the list by clicking with the mouse in the column all and press load for access to the archive:
Choose the place in the list and press Select to go back to the pane of test start. Afterwards you can manually change the setting loaded for each place simply selecting the place in the components list.
In the end to select the test program (unique for all components), click the panel programs Standard or Advanced and press Load for access to the selection window.
Highlight it in the list of those present in the archive and press Select.For more information on program standard and advanced management see the relevant paragraphs in chapter Archivio.
Complete the procedure by pressing on Confirm or Cancel for abort the start.
Repeat
Finished a test you can start a new one with the same settings as the last program done. Select on Menu Test » Repeat or press the keys CTRL+R or, simply, press the following button on the toolbar:
As for the editing (see next paragraph), the program displays a window to enter or change any information that does not affect the operation of testing.
Modify
Also during the test we can change the information of the program that do not go to affect the implementation of the test . Choose from the menu Test » Modify, or press CTRL+M, or press this button on the toolbar:
From the window that appears you can correct the personal data of place:Supplier/Type, Model, Description, Sample/Code/ANC, Stamping / Data production, Lot/Machine and Note. Is not possible to edit: maximum torque, number of axial and rotation contacts , rotation degree (Sx and Dx),value of the pressure plate and relative tolerance, and the test program running. If the test is not yet started, you can also remove one or more places from it. You must press the mouse icon in the upper panel and respond Yes to the next confirmation message. The place will now be removed from the testing resulting empty.
Start
Once you created a new test you have to start it . Select fromt the menu Test » Start or press F5 or, simply, press the following button on the toolbar:
Once started the testing, at the end of each rotation, the program shows the graph of the torque detected with values of temperature and pressure detected on the component.
The same function can be used to resume a previously interrupted test.
Pause
If a test is paused, it suspend the acquisition of data that can be retrieved later. To pause a test you have to select the menu Test » Pause or press the F6 or, more simply, press the following button in the toolbar:
Then select Yes in the following confirmation message. Wait for the program, complete the step of moving to return the components to the position of initial zero.
Interruption with unlock motors
As for the function Interruption this also stops the testing and in addition also unlocks the motors. To suspend a test select the menu Test»Pause or press the next button in the toolbar:
Then select Yes in the following confirmation message. Wait for the program, complete the step of moving to return the components to the position of initial zero.
Delete
The elimination of a test deletes all data. To do this you must select the menu command Test » Delete or simply press the next button in the toolbar:
Then press Yes in the following confirmation message.
Save
This function allows you to save in archive the test finished or interrupted. First, it is advisable to complete the insertion of data relating to the test and the results of test, so that once saved, it can be found easily with the research tools. Select the menu item Test » Save or, more simply, press the following button in the toolbar:
Select Yes in the following confirmation message.
Details
You can at any time display the details of the program test running. You must first select one of the places in the list on the right, and then select from the menu Test » Details , or press the key Ctrl + D alternatively press the following button from the toolbar:
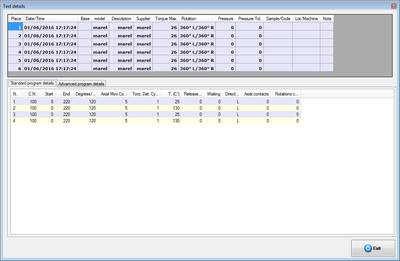
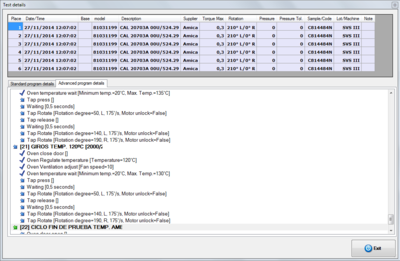
In the window that appears summarizes all the data of the test and in the case of standard program, all steps of the running program, while in the case of advanced program, block information and controls testing.
To return to the main screen, press the Exit button.
Details standard program
For every step of the program are displayed:
- N.: Progressive number;
- N.C.: Number of total cycle;
- I.: Starting degree of rotation;
- F.: Ending degree of rotation;
- Degree/Sec.: Rotation speed;
- C. Mov. Axial: Every how many cycles is performed axial movement;
- C. Ril. Torque: Every how many cycles is checked the torque value;
- T. (°C): Temperature of setpoint of the oven;
- C.Release: Every how many cycles runs release;
- Wait: Waiting time at the end of the rotation before returning back to zero;
- Direction: Initial direction of rotation;
- Cont. axial: Contacts axial connected;
- Cont. rotation: Contacts rotation connected.
Details advanced program
This window shows a list of blocks with the respective controls that characterize the current program. For each block next to the consecutive number (in brackets) and the name, show the number of cycles performed and the total. Immediately below lists all the commands in extended mode with the appropriate parameters enclosed in brackets. Icons to the left of each item indicate the current state of the program:
Maximum values
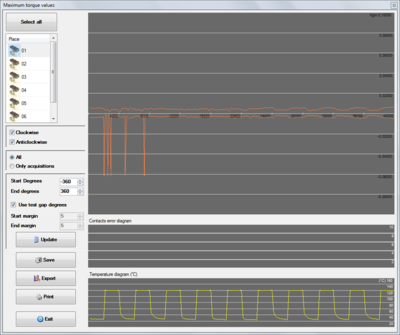
This function allows you to analyze for each place the maximum values of torque curves acquired during testing. Select from the menu Test » Maximum value, or press CTRL + V to access to this window:
The place or places to be analyzed can be selected in the list visible in the upper left of the window itself. Immediately below it is necessary to activate the boxes Clockwise/Counter-Clockwise to display its curves.
In form it displays three graphs and respectively starting from the top:
- graph of the maximum values;
- graph of errors in contacs;
- graph of the temperature detected in the oven.
The curves displayed in the first graph are affected by the following options:
- All: graph of the maximum values of all the acquired curves also for error;
- Only acquisitions: graph of the maximum values of the curves only acquired in automatic mode.
A more detailed analysis can also be performed by changing the options for degrees that allow you to include in the calculation only a few curves or even part of them:
- Starting degrees: start value acquisition ;
- Ending degrees: end value acquisition;
By default, the software calculates the maximum values taking into account the tolerance levels set in testing, but removing the checkmark from the Use degrees testing gap you can specify different tolerances in the following fields:
- Starting variance: degrees that are discarded for exclude peaks when rotation start;
- Ending variance: degrees to be discarded at the end of each curve for exclude peaks if you hit the limit.
Every time you change one of these values must be selected Update to run the calculations again. The other buttons on the form are:
- Save: save the graph of maximum values as JPEG;
- Export: export the maximum values detected as a text file ;
- Print: displays the print preview of the graphs;
- Exit: close the form.
Edit the scale of the cycles
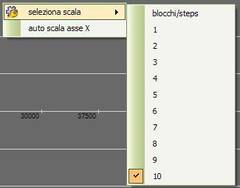
The X axis of the graph of the torque values gives the number of cycles, which can be modified in the following manner:
- click on the graph with the right mouse button;
- in the popup menu select select scale and then blocks / steps to view the subdivisions according to the blocks of the program otherwise a number from 1 to 10 representing splitter maximum number of cycles envisaged in the program:
To set automatically the maximum value of the X axis to the number of cycles executed , click on the option select scale and then autoscale X axis.
Result
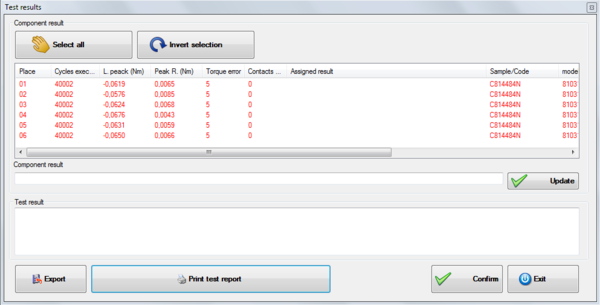
This function can access a summary window with all the data of the test and assign a result to the entire test as well and to each individual place. The results given are saved in the archive and can be included in the search functions of the tests.
Select from the menu Test » Result or press CTRL + E to access to the following window:
For each place listed in the list, shows the following information:
- Cycles executed: total number of cycles performed (can also be less than the total expected if the place has been interrupted);
- Peak L.(Nm) : maximum value of torque counterclockwise;
- Peak R.(Nm) : maximum value of torque clockwise;
- Torque error : number of rotations in which the torque exceeded the linit;
- Contacts error: number of rotations in which was detected a problem in the contacts;
- Result : result assigned by operator.
To assign at the same time to all components the same result, press Select all , then fill the field Component result and press Update .By pressing Invert selection can be easily selected all components except the one currently selected.
To export all the information displayed press Export and enter the name of the file to be created. The data will be exported in text format separated by tabs.
Use the button Print report to print a report of the test as explained in the next paragraph.
Press Confirm to save any results assigned otherwise Exit to close without saving the changes.
Print Report
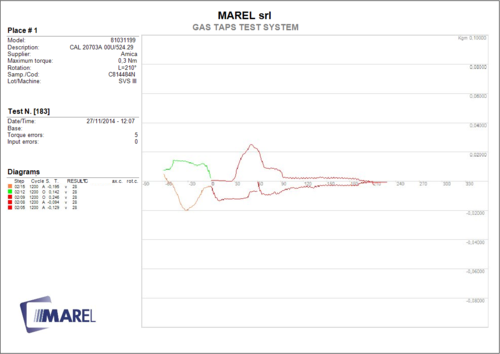
From the panel of test results by pressing the button Print report leads to the following selection of the Print Options window
To print a complete report simply press the button Conferm, if you wish to omit one or more position remove from the check list.
The available options are:
- Graphic maximum values : enable / disable printing of the page with the graphic of the maximum values of all position;
- Graphic maximum values for each position: enable / disable printing of the page with the chart of the maximum values of each position;
- Graphic torque values acquired : enable / disable printing of pages with graphics of the curves obtained for each individual position;
- Listing of the test program : enable / disable printing of the list of the commands of the test (only for advanced program).
Exclude a place
During the execution of a test you can exclude a place erasing all data acquired to continue only with the rest place. Select from the menu Places » Exclude and continue than answer YES to the next confirmation message.
Saving a place
Is possible to use this function if you want to save in archive the data from place and continue the test only with the rest of places. Select from the menu Place » Save and continue .
Resume testing place
If you selected the option Exclude and continues in case of reaching the maximum number of errors, the testing of the place is interrupted while continuing regularly for the remaining. The operator manually after raising the maximum number of errors can reseat the terminal under test as it deems appropriate. To resume testing of the station, after selecting it, click on the menu Station » Resume testing and answer Yes to the next confirmation message.
Test database
This chapter describes the procedures for the search and the opening of the tests that are stored locally or on an external drive (network, USB key).
Open a saved test
This feature allows you to load and view the tests previously saved in the local database. Select from the menu Archive » Test , or press F9 alternatively press the following button in the toolbar:
As a result the following window appears:
Pressing the button Find will display all the tests saved. You can also search by entering part of the information required in the following fields:
- Number : test number automatically assigned;
- Date from.. to .. : starting date of the test;
- Model;
- Description;
- Supplier/type;
- Sample/Code;
- Lot/Traceability;
- Notes;
- Sample Result: Result assigned by the operator.
- Plane : code of test bench (if inserted).
After viewing the test, select the one you want to see and press Load. The test selected will appear into the list of tests.
To permanently delete the test from the Test Database press Delete and respond YES to the following confirmation message. The delete function is only available after entering the password protection (Refer to the paragraph Password of the Tool chapter).
You can export to a text file the list of tests carried out by pressing the Export List button.
To exit this window without loading a test, press the Exit button.
Open an external test
This feature allows you to load and view the tests stored on network or other external memory storage. Select from the menu Archive»External Test or press CTRL + F9 then select the location of the archive:
If the path is valid, you will see the same window as the search and selection for testing stored locally. Then consult the previous section for more details.
Closing a test archived
This function allows you to close a test loaded from the archive and is rapresented with the following icon:
For closing the test it is necessary to select the test you want to close and select from the menu Archive » Close or press the key combination Ctrl + C ; alternatively press the following button in the toolbar:
Backup test database
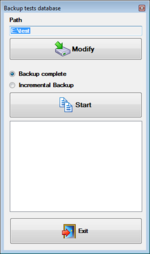
Using this feature you can make a copy of the database and all the tests stored on a network drive or external storage. Select from the menu File »Backup to access the following panel:
Opening automatically displays the last path used so you need only press the Start and wait for the completion of the copy. The backup can be of two types:
- Backup Complete: copy all the files in the destination and overwrites any files already present (with the same name so inherent to software GasTapsTestSystem);
- Incremental Backup: copy all the files that are not in the destination folder.
With the button Modify is possible to modify the path.
Archive components and programs
The paragraphs in this chapter describe the interfaces and functions for the management of the archive components of the standard programs and advanced programs. While there are no special restrictions for viewing, for the management of the archives you have to enter the password as described in the first paragraph Password of tools chapter.
Components
To enter the archive components select from the menu Archive » Components or press F2 ; alternatively press the following button in the toolbar:
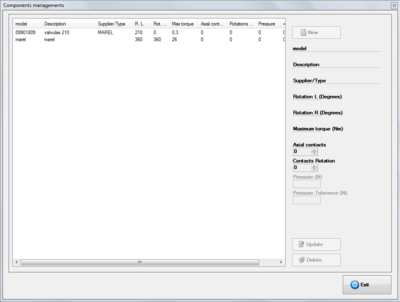
The following window appears:
To add a component, you must:
- Press with the mouse on New button.
- Insert the various information in the fields;
- Press Update button to save data.
To edit a component, you must:
- From the list select the component to be modified.
- Modify the information displayed;
- Press Update button to save data.
To delete a component you must
- From the list select the component to be deleted.
- Press Delete button and press Yes to the next confirmation message.
To exit the window press with mouse the Exit button.
The registry component consists of the following information:
Model:Identification code of the component.
Description:Description if needed
Supplier/Type:The component manufacturer or type.
Rotation L:Specifies the maximum rotation angle of anticlockwise of the component from 0 ° to 360 °.
Rotation R:Specifies the maximum rotation clockwise angle of the component from 0 ° to 360 °.
Max torque:It is the maximum acceptable torque value beyond which the machine assumes that there is a failure of the component. The value is expressed in Nm (Newton / meter).
Axial contacts:Number of contacts that can change status during the axial movement (press / release). The system can test at most one axial contact.
Rotation counters:Number of contacts that can change status several times during the rotation phase left or right. In the system it is possible to test a maximum of three contacts of this type.
Pressure:It indicates the nominal pressure that can be made on the component. Put 0 to disable the view and control.
Pressure tollerance:Indicates the extent to which values the measured pressure can be considered correct.
Program
The software GasTapsEnhTestSystem provides two types of programs for the execution of the tests: Standard program e Advanced program. The standard programs can be used to perform the cycles with a single rotation toward the opening and subsequent return to the initial position, while the advanced programs allow you to perform, in the same cycle, more rotations in different positions. Also through the advanced programs you can run leakage testing.
Standard program
To enter standard program management select menu Archive » Standard programs or press F3; or press the next button in the toolbar:
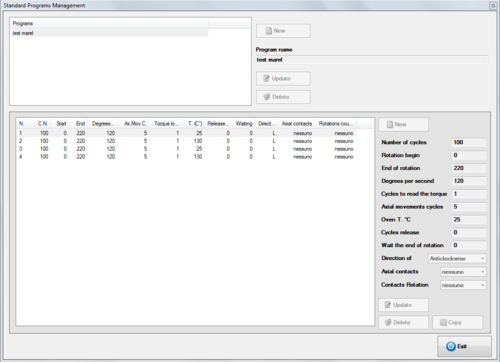
The following window appears:
The screen is divided into two parts: the top panel is used to add, modify and delete a program; the bottom panel to add, edit and delete the steps of the selected program.
To add a program you must:
- Press New.
- Type the name of the new program in the “Name” field program;
- Press Update to save data;
- Then proceed as described in the next paragraph for the inclusion of the Steps.
To change the name of a program you must:
- From the list select the program to modify.
- Type the new name in the “Program Name” field.
- Press Update to save data.
To delete a program, you must:
- From the list select the program to be deleted.
- Press Delete and click Yes in the next confirmation message.
Step
For each program you have to enter at least one steps that is a phase that is repeated a number of times before proceeding to the command.
To add a step:
- Press New.
- Enter the required data in the text boxes;
- Press Update to save data.
To modify a step:
- Select the step in the list that you want to modify.
- Change the information displayed in the text boxes;
- Press Update to save data.
To delete a step:
- From the list select the step you want to delete.
- Press Delete and Yes in the next confirmation message.
You can also create a copy of a step already existing:
- From the list select the step that you want to make a copy.
- Press Copy.
To close the file, press Exit.
For each step must be inserted the following parameters:
Number of cycles
It indicates the number of cycles to be performed. Each cycle is composed by a counter-clockwise rotation and clockwise or vice versa according to the direction of the initial rotation.
Rotation begin
It represents the degree of rotation beginning. If non-zero, the start or any restart of the testing will be performed moving the tap up to the set value.
End of rotation
It represents the degree in which it stops moving. If you enter the value “0” is made a rotation to the stop; it stops when the value of torque exceeds the limit of 0.6 Nm. If the program includes at least one step to the stop, the maximum rotation of the component is automatically updated. At the beginning of the step during the detection component it will be rotated clockwise or counterclockwise at a reduced speed.
Degrees for second
It indicates the speed of rotation.
Cycles to read the torque
It indicates after how many cycles it performs a movement torque detection (adjustable in the options of the program as described in the Opzioni Chapter Settings ) in which are stored the values of torque.
Axial movements cycles
It indicates after how many cycles is performed axial movement for release and the pressure tap.
Oven T. (°C)
Setpoint temperature of the oven for the entire duration of the step. The behavior of the oven in the stages of change in temperature can be modified by the options of the program (Refer to the Option in the Settings chapter).
Oven temperature (degree)
It indicates the oven temperature to be set for the duration of the step; it is expressed in degrees and may range from 20 to 200.
Cycles release
It indicates after how many cycles the tap is released and then pressed to the limit, and left in the position of “Open.”
Wait the end of rotation
It indicates the wait time, in seconds, before start moving backwards.
Direction of
It indicates the direction of the first changes: Counterclockwise or Clockwise. If you want to test a tap with a central position 0 which provides a rotation clockwise and counterclockwise, before testing you must disable the search starting position as described in Opzioni chapter Settings.
Axial contacts
Set this value to “1” to test the axial contact during the pressure and release, or “0” not to perform a test. If enabled, the outcome will be positive if they are detected two changes of state during the pressure and release.
Rotation contacts
During the rotation it is possible to test up to a maximum of 3 contacts. Setting a value different from 0 the rotation is successful, if for each contact specified, the system will detect a change of state in both the movement towards the opening for the return to the initial position.
Advanced program
To enter the editor of advanced programs select menu Archive » Programs advanced or press F4 or simply press the next button in the toolbar:
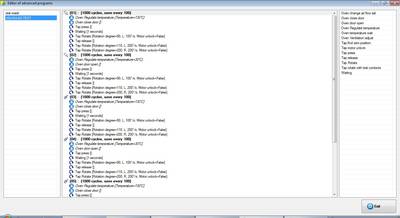
The following window appears:
Unlike standard programs, the advanced programs are divided into blocks. Each block, repeated for a preset number of cycles, can contain one or more commands selectable among those in the right list.
The management window is divided into three panels: the left is a list of programs, the center is a list of blocks and controls belonging to the selected program, to the right the list of commands can be inserted.
Program
To create a new advanced program:
- Right click on the list of programs and select New from the menu that appears;
- Enter the name of the program and press OK .
To rename an advanced program:
- Right click on the program you want to rename and choose Rename from the menu that appears.
To create a copy of an existing program:
- Right click on the program you want to copy and choose Copy from the menu that appears;
- In the bottom of the list will appear an exact copy of the selected program with the same name.
To remove an advanced program:
- Right click on the program you want to delete and choose Delete from the menu that appears;
- Press Yes to the next confirmation message.
To import a new advanced program in XML format:
- Click with the right button in the program list and choose Import XML from the menu that appears;
- Enter the file name and press OK.
Export an advanced program to XML:
- Right click on the program you want to export and choose Export XML from the menu that appears;
- Enter the file name and press OK.
To print the listing of a program:
- Right click on the program and choose Print from the menu that appears;
- select the printer and press OK.
Block
To create a new block:
- Select the advanced program;
- Click with the right button of the mouse in the central list and choose New Block from the menu that appears;
- Enter a description of the block, the number of cycles, the number indicating how many cycles save a curve, and the maximum torque if other than the default component;
- Press Ok.
To edit a block:
- Click with the right button of the mouse to select the block to edit and choose Edit Block from the menu that appears;
- Edit the parameters in the following window;
- Press Ok to confirm the modifications.
To delete a block:
- Click with the right button Of the mouse to select the block to remove and select Delete block from the menu that appears;
- Press Yes to the next confirmation message.
To copy a block:
- Click with the right mouse button to select the block to be copied and choose Copy block from the menu that appears.
You can also create a link to a block. A link creates an identical copy of the selected block and any changes applied to each of the two blocks will also be applied to another. It is also possible to create more than one link for each block.
- Click with the right mouse button to select the desired block and choose Create Shortcut of this block from the menu that appears.
Command
In the right panel you can see a list of available commands to insert in the blocks.
To add a command, drag it over to the block in which you plan to add. First set if it is a command at a single execution or if it will run at each cycle of the block. Enter the parameters, depending on the command, and press OK to confirm the entry.
To edit a command, select it with the right mouse button and choose Edit command from the menu that appears. Change the parameters and press OK to confirm the changes.
To delete a command, select it with the right mouse button and choose Delete command from the menu that appears. Press Yes to the next confirmation message.
List of available commands
In this paragraph are summarized all the implemented commands that can be used in the implementation of advanced programs.
| Command | Oven door open | |
|---|---|---|
| Description | Open the door of the oven. | |
| Command | Oven temperature wait | |
|---|---|---|
| Description | It waits if the oven temperature is below the minimum value or if it is above the maximum value set. | |
| Parameters | ||
| Temp. min | temperature minimum value | |
| Temp. max | temperature maximum value | |
| Command | Waiting | |
|---|---|---|
| Description | it waits for the specified time. | |
| Parameters | ||
| Seconds | Waiting time (minimum 1) | |
| Command | Oven close door | |
|---|---|---|
| Description | Close the door of the oven. | |
| Command | Tap press | |
|---|---|---|
| Description | advancing the motor to press the rod of the tap. | |
| Command | Oven change air flow set | |
|---|---|---|
| Description | Moves the AirFlap present in nozzle air exchange. | |
| Parameters | ||
| Position AirFlap | percentage position of AirFlaf (0=close, 100=full open) | |
| Command | Oven regulate temperature | |
|---|---|---|
| Description | set up the temperature of setpoint of the oven. | |
| Parameters | ||
| Temperature | setpoint temperature in °C | |
| Command | Oven ventilation adjust | |
|---|---|---|
| Description | set the speed of ventilation. | |
| Parameters | ||
| Speed Ventilation | percentage rate of ventilation (0 = off, 10 = maximum) | |
| Command | Tap release | |
|---|---|---|
| Description | reverses the motor to release the rod of the tap. | |
| Command | Tap rotate | |
|---|---|---|
| Description | erforms the rotation of the motor. | |
| Parameters | ||
| Degree rotation | degrees to be performed | |
| Rotation | direction of rotation: clockwise (R), counterclockwise (L) | |
| Speed rotation | speed in degrees per second of rotation | |
| Unlock motor | state of the motor at the end of rotation. If disabled, the motors remains in “traction” | |
| Command | Tap rotate with test contacts | |
|---|---|---|
| Description | it performs the rotation of the motor and performs the test of the contacts. | |
| Parameters | ||
| Degree rotation | degrees to be performed | |
| Rotation | direction of rotation: clockwise (R), counterclockwise (L) | |
| Speed rotation | speed in degrees per second of rotation | |
| Unlock motor | state of the motor at the end of rotation. If disabled, the motor remains in “traction” | |
| Pulse contact mov. axial n.1 | if enabled at the end of the rotation, the input n. 1 must have read a pulse. It is necessary that before the rotation command there is the command of pressure or release | |
| Pulse contact mov. rotation n.2 | number of pulses to be acquired at the end of rotation by the input n. 2 | |
| Pulse contact mov. rotation n.3 | number of pulses to be acquired at the end of rotation by the input n. 3 | |
| Pulse contact mov. rotation n.4 | number of pulses to be acquired at the end of rotation by the input n. 4 | |
| Command | Tap motor unlock | |
|---|---|---|
| Description | perfmor the command to unlock the motors. | |
| Command | Tap find zero position | |
|---|---|---|
| Description | performs a movement of 360 ° for research of 0. The movement stops when the hardware limit kicks in. | |
| Parameters | ||
| Rotation | direction of rotation: clockwise (R), counterclockwise (L) | |
| Speed Rotation | speed in degrees per second of rotation | |
| Unlock motor | state of the motor at the end of rotation. If disabled, the motor remains in “traction” | |
Tool
This chapter describes the functions in the Tools menu of the application.
Install components
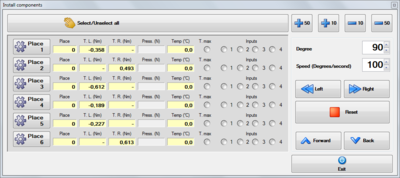
This feature allows the user to make axial movements or rotations during the installation of the components or during breaks of active testing.
To access the panel select the menu Tools » Install Components or press the F8 ; more simply press the next button in the toolbar:
The following window appears:
On the left there are listed the places present in the system and for each of these are displayed the following information:
Place: place that is updated with each manual rotation performed;
T.L. (Nm): instantaneous values of torque during counterclockwise rotation;
T.R. (Nm): instantaneous values of torque during clockwise rotation;
Press. (N): axial pressure exerted on the component is available only if there is any axial movement, measured in Newton;
Temp (°C): temperature of the oven or of a possible additional thermocouple placed in the component itself, measured in ° C;
Limit: LED that turns red if the input hardware limit detects a twist exceeding 0.6 N;
Input: LEDs corresponding to the inputs that are green if the contact is closed.
In order to rotate it is necessary to select a location by clicking with the mouse in the corresponding key. You can select all the places by pressing the mouse button Select all . Subsequently with the keys Left or Right you rotate with the degree and the speed set. The degree and the speed can be varied without the help of the keyboard using the buttons Up and Down:
Reset button performs the release of the motors while the keys Forward and Back respectively advance and retreat motors.
Rotation
It is possible to manually rotate the motor, counterclockwise or clockwise with an angle and with a rotation speed variables.
Degrees
The rotation can be from 1 to 360 degrees.
Speed degrees/second
Speed of rotation to do from 20 to 200 degrees per second.
Left
This command start the left rotation with degrees and speed specified.
Right
This command start the right rotation with the degrees and speed specified.
Reset
This command stops the movement and unlock the motors. (see section Options in chapter SETTINGS).
Axial movement
It is possible perform manually the axial movement of the motors to verify the correct positioning of the components.
Forward
The command pushes forward The motors of the selected places.
Backward
The command moves back the motors of the selected places.
To return to the main application, press with the mouse, the button Exit.
Input calibration
With this tool it is possible to calibrate the inputs in thermocouple, used for reading the temperature directly on the components, and also any other pressure inputs.
Password
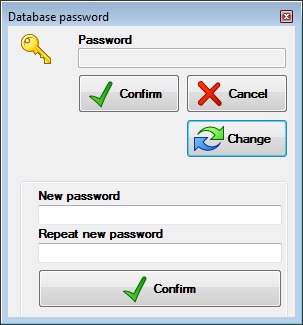
Some of the functions of database management and editing of parameters at startup , are password protected and you must enable them to take some sort of authentication by entering a password.
To enable the password-protected functions, proceed as follows:
- select Instruments→Password or press the following button in the toolbar:
- insert the password in the windows and press the button Confirm.
To disable the functions (only if enabled):
- select Instruments→Password or press the following button in the toolbar:
To change the password :
- select Instruments→Password or press the following button in the toolbar:
- Then enter the password in the window that appears and press Change;
- Insert twice your new password in the appropriate text boxes displayed;
- Confirm the change with the key Confirm immediately below the boxes.
Setting
This chapter describes the interfaces of the operating modes of the system and the graphical display of data.
Grafic
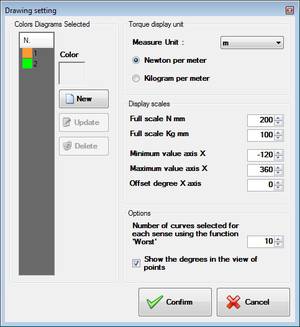
To enter in the graphic setting select from the menu Setting » Grafic or push the key F10; or push the following key in the toolbar:
As a result you will see the following window
The panel is divided into two parts: the left panel allows you to add, edit and delete the colors of the selected curves; the panel on the right allows you to change the unit of measure, the display scales, the number of the selected curves in every direction with the function “Worst” and to choose whether to show the degrees in the display of the points.
To add a color in the selected diagram is necessary:
- Press with the mouse, the button New .
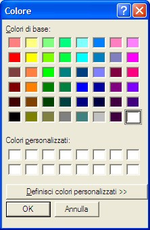
- Select with the mouse the button Color ; therefore, will appear the following figure:
- Choose a color with the mouse and press the button OK ;
- Press the button Update to save the data.
To change a color, you must:
- From the list select the color to change.
- Press with the mouse the button color .
- Choose a color with the mouse (see figure above) and press OK.
- Press Update to save the data.
To delete a color, you must:
- Select, from the list, the color to delete.
- Press with the mouse the button Delete and respond Yes in the next confirmation message.
To exit the window press the mouse button Confirm.
Options
To enter in the managements of the options , select ftom the menu Program Options or push the key F11.
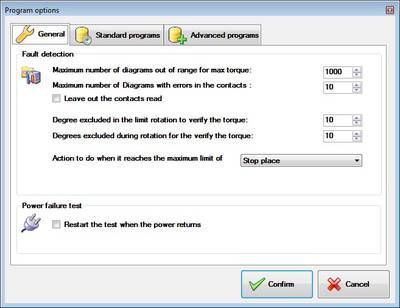
The windows is divided in three panels: General, standard program and Advanced program. The first panel contain the general options of application, the other two the basic options of the program running.
General
The options in this panel are for all tests regardless of the running program.
Fault detection
Maximum numbers of test out of maximum torque range
The user can set the maximum number of diagrams out of range, exceeding the torque, which are automatically saved during testing in addition to those planned. The achievement of the maximum number programmed can interrupt the test and wait or continue without the failed component.
Maximum diagrams with errors in contacts
The user can set the maximum number of diagrams with contacts errors, which are automatically saved during testing in addition to those planned. The achievement of the maximum number programmed can interrupt the test and wait or continue without the failed component.
Exclude detecting contact
If necessary you can select this option to let the program continues without count them.
Excluded Degree from the limit test
In performing the end limit test you must specify how many degrees, from the beginning and end of the rotation, should be excluded in the test limit. Important this option must be set before the start of a test.
Excluded Degree from the torque test
In performing the end limit test you must specify how many degrees, from the beginning and end of the rotation, should be excluded in the torque test limit. Important this option must be set before the start of a test.
Action when the maximum limit errors are reached
It indicates the action to take if a component reaches the maximum number of errors in the Torque or in the contacts detection:
- Stop testing: stop testing without any action;
- Stop place: interrupted testing of the tap in error and continues testing the remaining components;
- Exclude and continues: excludes the failed component (losing all data) and continues testing the remaining components.
Check voltage absence
Restart the test when the power come back
In the case that the whole system, except the oven, is powered by a UPS it is possible to continue the test after the restoration of the supply voltage. By selecting this option, rather than stop the test for communication error, the oven is switched off, the program will wait the restart to resume testing of components.
Standard Program
The Options on this panel affect only the Standard Programs.
Control of the Oven Temperature
Temperature Setpoint
The first two options, if enabled, affect the duration of the test , at every change of set Point, it stops the execution and wait that the temperature of the oven reaches the setpoint established. The first option affects the passage from one cycle cold to a hot cycle, the second instead interacts in passing from one cycle cold to warm. Each option provides a range that can be increased to decrease the wait.
Open the door during the cooling
It enable the door opening during the cooling phase.
Movements
Unlock the motor at the end of motion
If this option is selected, after the rotation, the motor remains free to turn. In performing of the end stop tests it is preferable to leave the motors held by disabling this option to avoid losing the position.
Speed of torque detection (degree/second)
You can set the speed of rotation of the component in the torque data logging. The default is 20 degrees / second which allows for about 2 readings for each degree. It is preferable not to change this value.
Move the motor to find the start position
The user can also choose to run the movement to find the initial position of the component, at the start of test. The search is performed by rotating the component clockwise. Obviously, the component must provide a limit.
Stop the movement before the limit
Because after many cycles running at the end of rotation,it canarise problems in the component, you can set how many degrees the rotation is stopped before the rotation limit. By entering a value different than 0, the test of end limit will be executed only during the cycles of torque detection , for all other cicles , the rotation will be stopped early based on the value entered.
Exclude pressure in the return phase
Activating this Option, it is disabled the pressure of the tap during the movement to return to the starting position. The option affects all cycles of testing during which it is programmed to release the valve in the open position.
Time necessary to complete the push command
Time necessary to complete the push movement, before to start the rotation phse. The value is in milliseconds.
Enhanced Programs
The options in this panel affect only the execution of enhanced programs.
Blocks
Disable all the comands of the oven
This option allows to ignore all the commands of the oven, both setting (setpoint position airflap, ventilation) and the standby temperature.
Esxlude waiting
With this option the program ignore all the waiting commands.
Oven Options
The working mode of the oven can be changed from a control panel in the main screen of the program.
The oven can works in two modes:Automatic and Manual. To select one or the other option , push the key Auto o Manual and answer Yes to the confirm message.
Automatic Mode
The oven temperature change in correspondence to the steps or the commands of the test programs.
Manual Mode
The temperature and ventilation of the oven remain stable as values set manually by the operator during the execution of the standard programs that provide step at different temperatures or enhanced programs with commands that controls temperature and ventalation. Even the arm to open and to close the door, remains stationary in its current position. In this mode to change the temperature of the oven set the desired setpoint temperature in the field “Temperature set” and press the OK button .
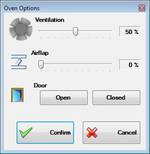
Manual Regulations
In manual mode, you can make the following adjustments:
- Ventilation;
- Nozzle cooling;
- Opening door.
To access the panel settings, press the corresponding button of the options and select the button Confirm to apply your changes or the Cancel button to exit.
Events
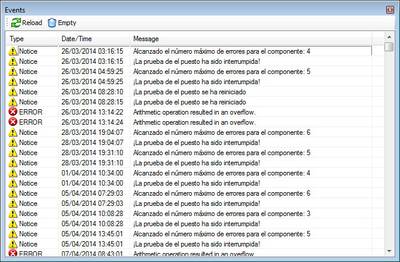
The program includes a register which stores any errors that may occur. Each fault is signaled to the operator by a message in which they are given an identification number and a brief description of the error. The same information is also stored in a register. Errors that occur during the execution of automatic procedures can not be communicated to the operator via message but are still stored in the registry.
View
To consult the Events list click with the mouse in the menu File » Events » View or push the button from the toolbar:
Il program display the following panel:
You can find three types of events according to their importance:
- Error
- Notice
- Information
Double-clicking on an event you can view the entire message in the event that the window is not wide enough.
Deleting
To clear the event log you must select the menu File » Events » Empty and answer Yes to the following confirm message.


